
Create a New Treatment Plan
Understanding Treatment Plans
Think of Treatment Plans as the different options you may recommend to address a patient’s diagnosis within a single Treatment Phase.
Once you’ve established the patient’s Treatment Phase and documented their Exam/Diagnosis, you can create multiple Treatment Plans to explore and present different treatment options.
For example, a patient entering Comprehensive Treatment may have several recommended options:
- Plan 1: Invisalign Treatment
- Plan 2: Clear Fixed Appliances (Braces)
- Plan 3: Fixed Appliances with Surgical Treatment
Each Treatment Plan shares the Exam/Diagnosis findings from the same Treatment Phase while allowing you to customize the proposed treatment sequence and recommendations.
You can even prepare a contract for each proposed Treatment Plan to evaluate the associated case fees in the Contracts/Ledgers tab. Just remember, do not activate a contract until the patient has selected their preferred treatment option and is ready to proceed.
Once the patient chooses their preferred treatment option, mark that Treatment Plan as Active. The other proposed plans remain available for future reference.
Treatment Plans vs. Treatment Phases
Remember, Treatment Phases and Treatment Plans serve different purposes.
- Treatment Phase: Represents a specific period in the patient’s care, preserving their Exam/Diagnosis, clinical history, and treatment information.
- Treatment Plan: Represents a proposed treatment option for addressing the patient’s diagnosis within that phase.
When a patient completes a phase and later returns for another period of care, create a new Treatment Phase with a new Exam/Diagnosis and associated Treatment Plans.
💡 Tops Tip: Don’t create a new Treatment Phase simply to offer another treatment option! Instead, create additional Treatment Plans within the existing phase. See Create a New Treatment Phase for more information.
Before You Begin
Always confirm that the correct Treatment Phase is marked Active before creating Treatment Plans. This ensures your treatment recommendations are associated with the appropriate phase of care.
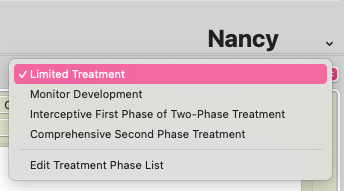
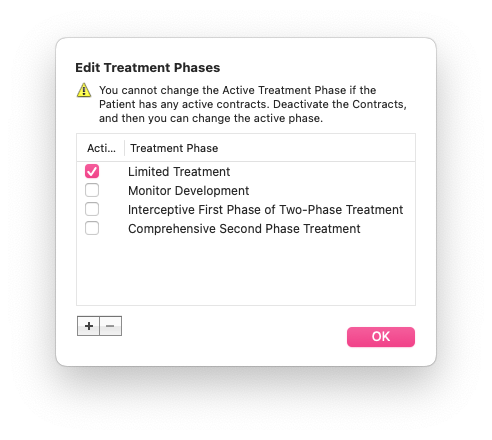
Important: The checkmark displayed in the Treatment Phase dropdown indicates which phase you are currently viewing, not necessarily which phase is Active. To verify or change the active phase, select Edit Treatment Phase List and confirm that the correct phase is marked Active.
|
|
|
Create an Additional Treatment Plan
Have more than one treatment option to present to your patient? Follow these steps to create additional Treatment Plans within the same Treatment Phase.
- Open the patient’s chart and go to View > Patient Info…, or press Command + I.
- Select the Clinical side of the chart.
- Select Dx/Tx Plan.
- Enter the proposed treatment information for the patient’s first option. For example, Dennis’s first proposed plan includes:
- Treatment Name: Full Braces
- Treatment Method: Fixed Appliances
- Estimated Treatment Length: Minimum and maximum of 18 months
- Treatment Phase: Comprehensive Treatment
-
Remember: Before entering treatment information, always confirm that you’re working within the correct Treatment Phase.

-

- In the upper-left corner, click the up/down arrows to open the Treatment Plan dropdown.
-
Select Edit Treatment Plan List…, then click Create Plan.


-
The new plan will be named Untitled Plan by default. Click OK. You can enter the plans descriptive name within the Clinical view.

- Notice that the Exam/Diagnosis findings remain, while the treatment planning fields are blank and ready for your next option.
-
Enter the proposed treatment information for the additional plan. In Dennis’s example, his second option is Invisalign Treatment for 12 months.


You can continue creating additional Treatment Plans as needed.
Review and Select a Treatment Plan
While the patient considers their options, use the Treatment Plan dropdown to toggle between proposed plans and review their details.
Once the patient selects their preferred treatment:
- Open the Treatment Plan dropdown in the upper-left corner.
- Select Edit Treatment Plan List…
- Place a checkmark next to the Treatment Plan the patient has chosen.
-
Click OK.


The selected Treatment Plan is now Active, while the other proposed plans remain available for future reference. You can now active the contract associated with the active plan.
💡 Tops Tip: Creating multiple Treatment Plans allows you to preserve the options presented to a patient, including their proposed treatment sequences and associated case fees. This provides a valuable reference when reviewing treatment recommendations and decisions throughout the patient’s care.