Updated: eClaims Requiring Attachments
Below are a few options when required to send an attachment with an e-claim or electronic PreAuthorization.
1) Creating a Stand-Alone Attachment claim in DentalXChange before you eFile from Tops.
2) Sending a Stand-Alone Attachment claim in DentalXChange upon the insurance/payer's request
3) Edit an existing claim in DentalXChange to add an attachment reference ID.
📝 We realize that these are extra required steps since Tops does not append attachments to an eClaim. Mailing a claim with required attachments is also an option.
Creating a Stand-Alone Attachment claim before you eFile from Tops.
Step 1: Create the attachment in DentalXChange
- BEFORE efiling your claim that requires an attachment from Tops, you will need to create a stand-alone attachment claim in DentalXChange.
- Log in to DentalXChange: https://register.dentalxchange.com/reg/login?0 or go to Matrix>eClaim Statuses
- Navigate to the Dashboard.
-
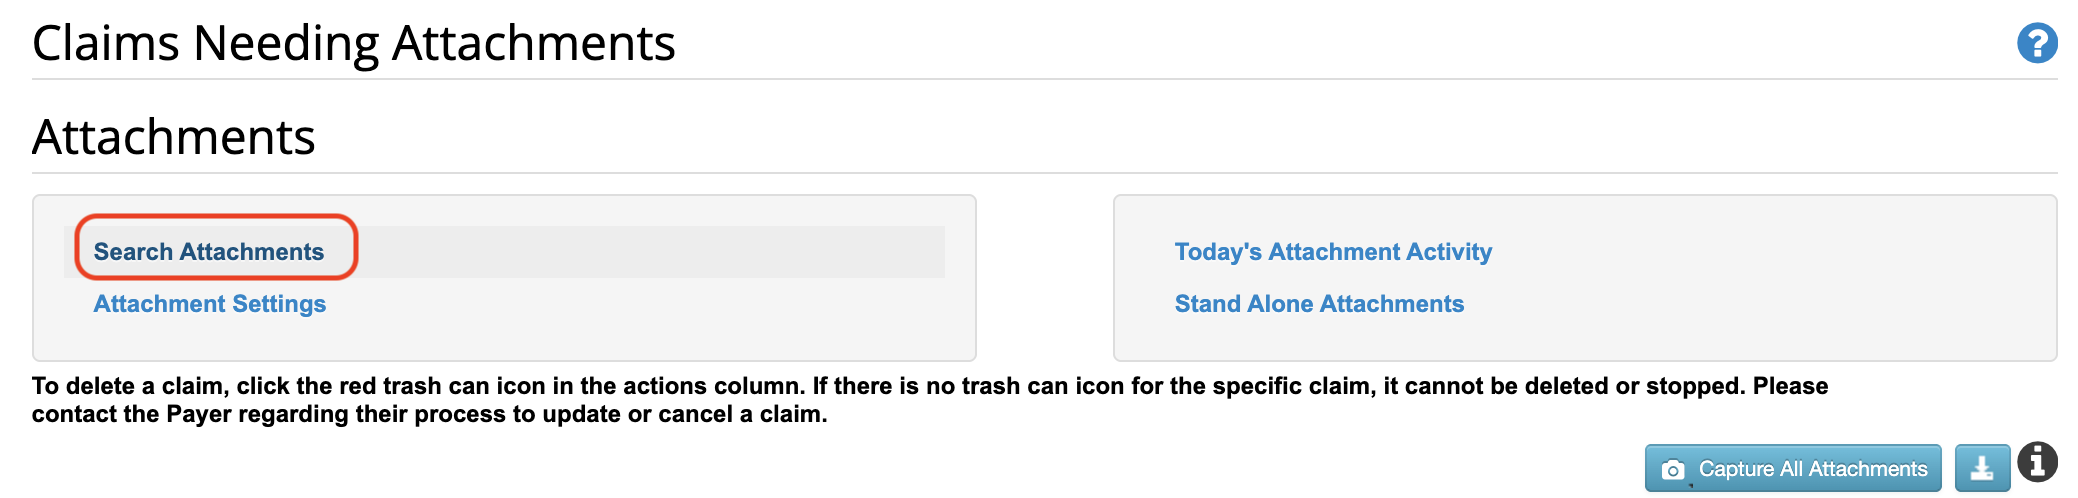
From the Claims menu, click Attachments. The attachments menu can be found in different areas.
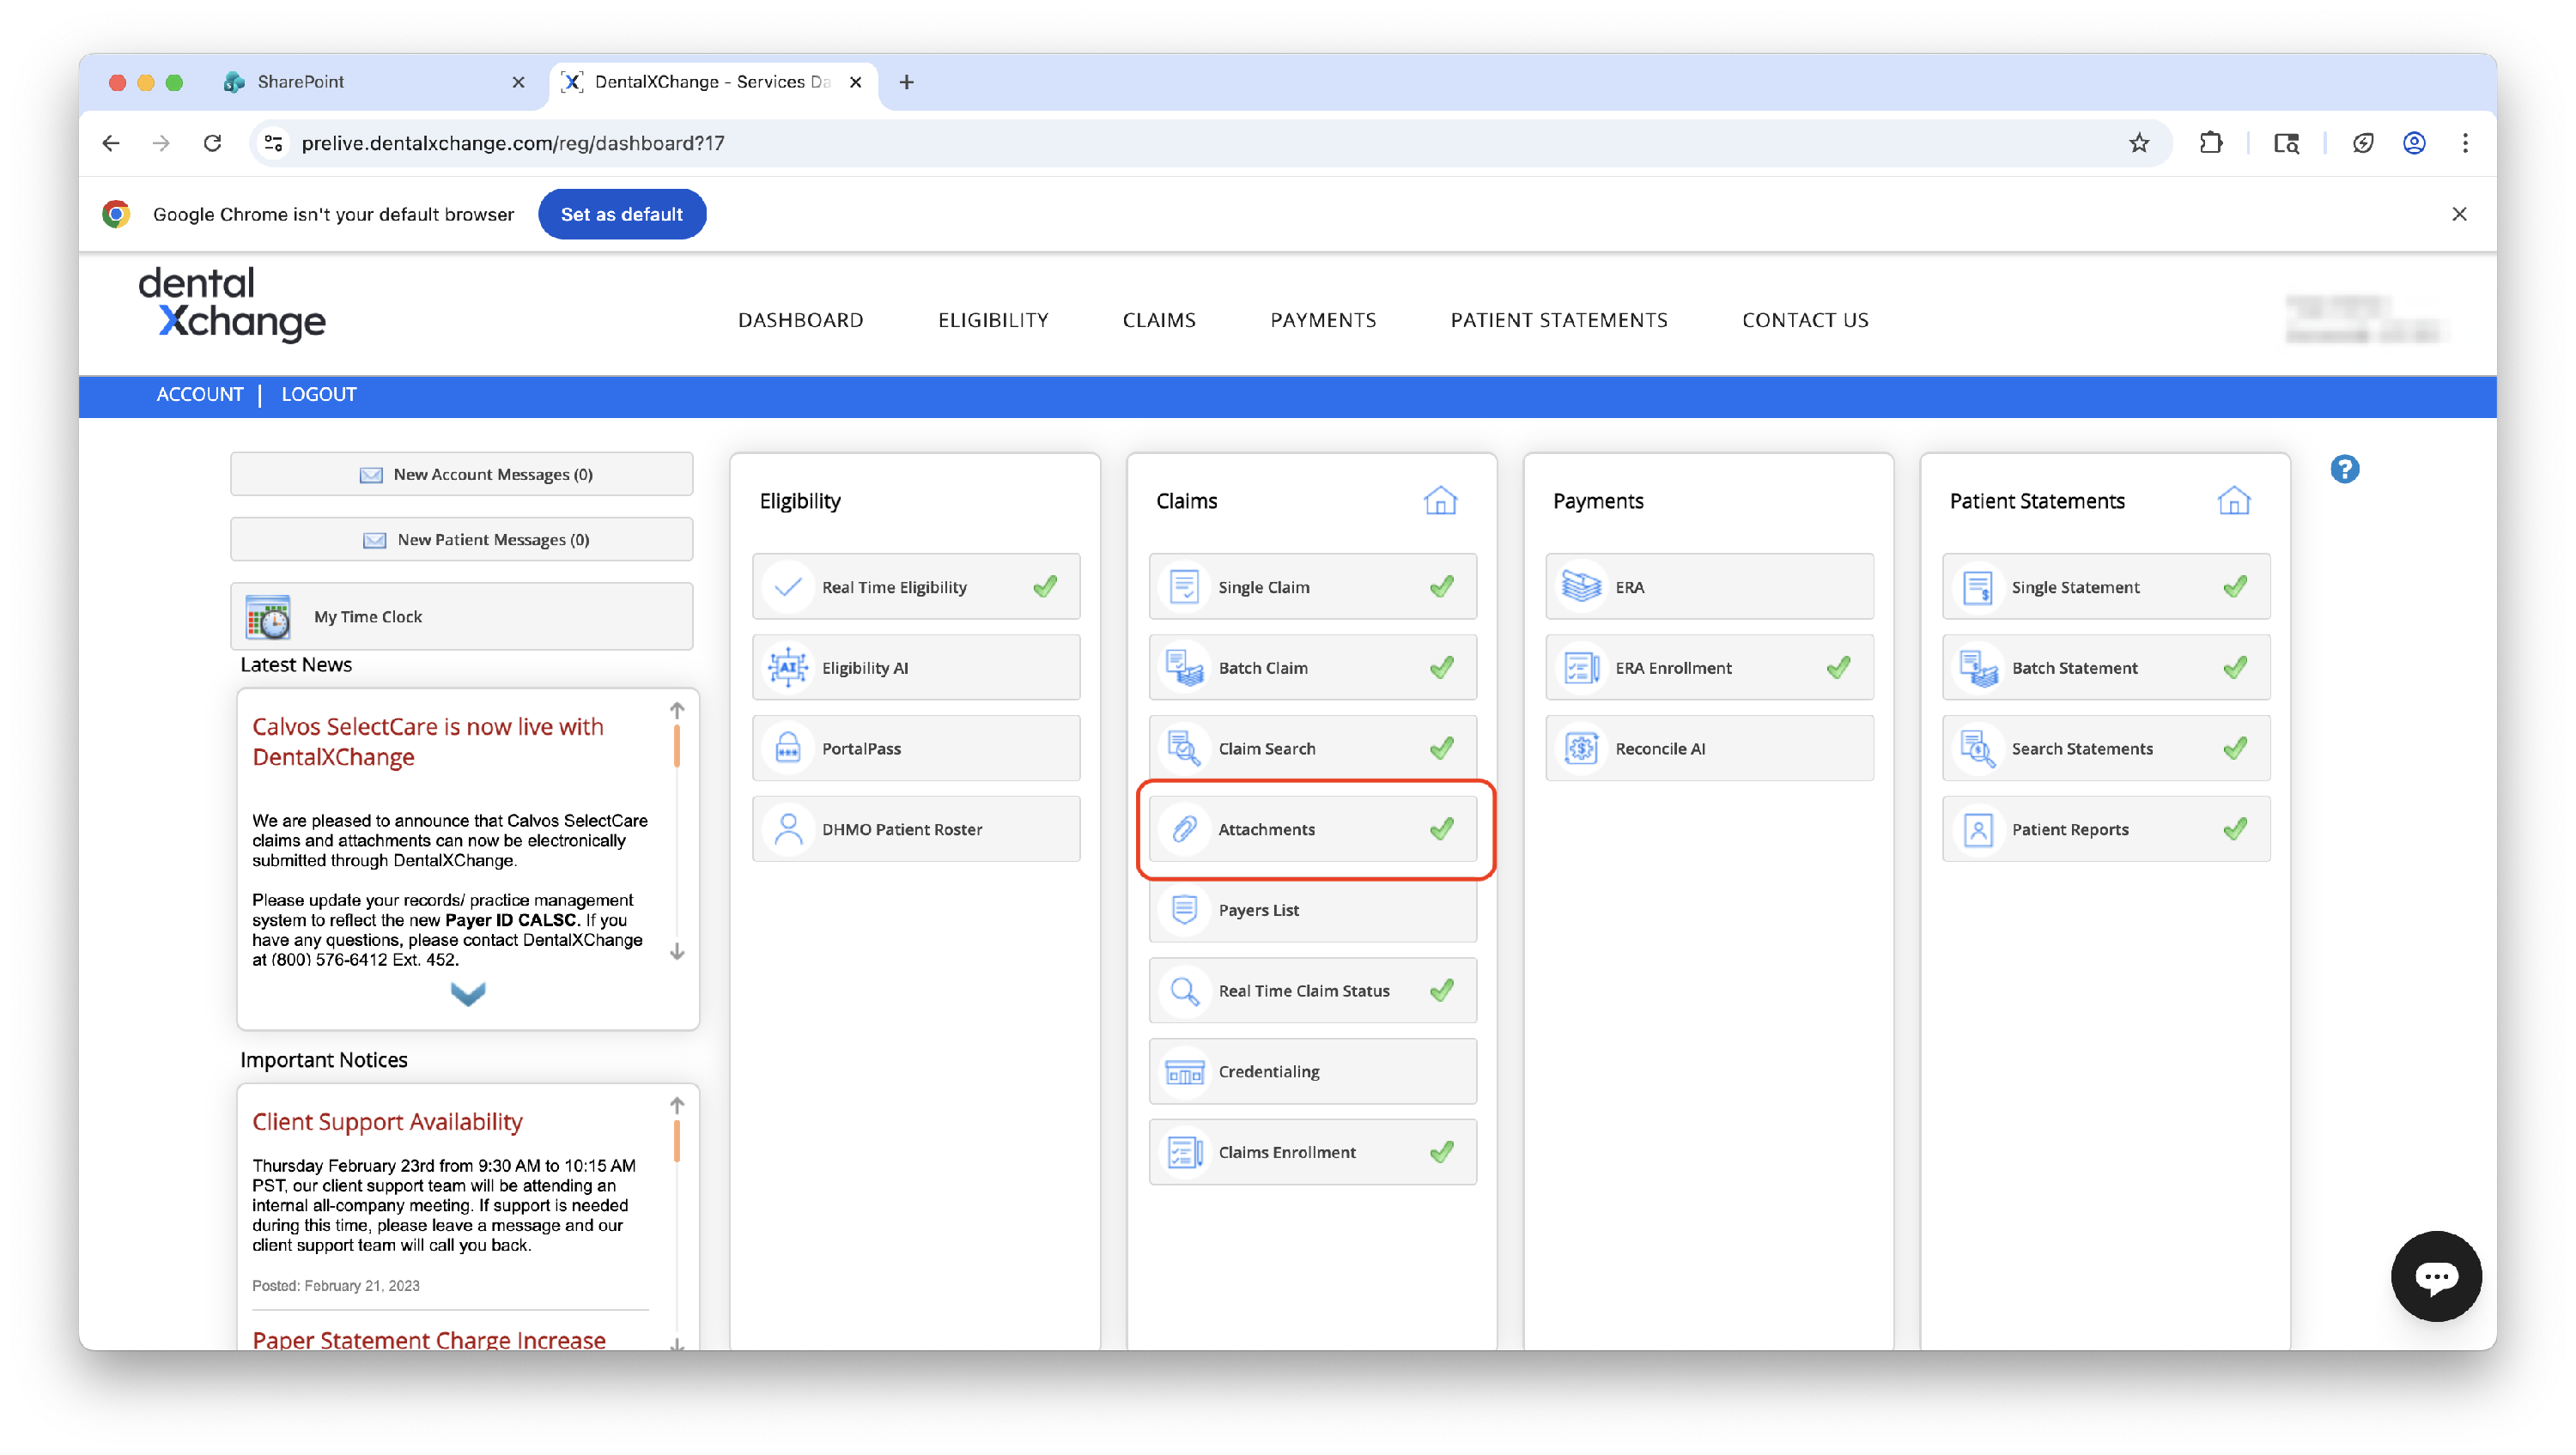
From the Dashboard


-
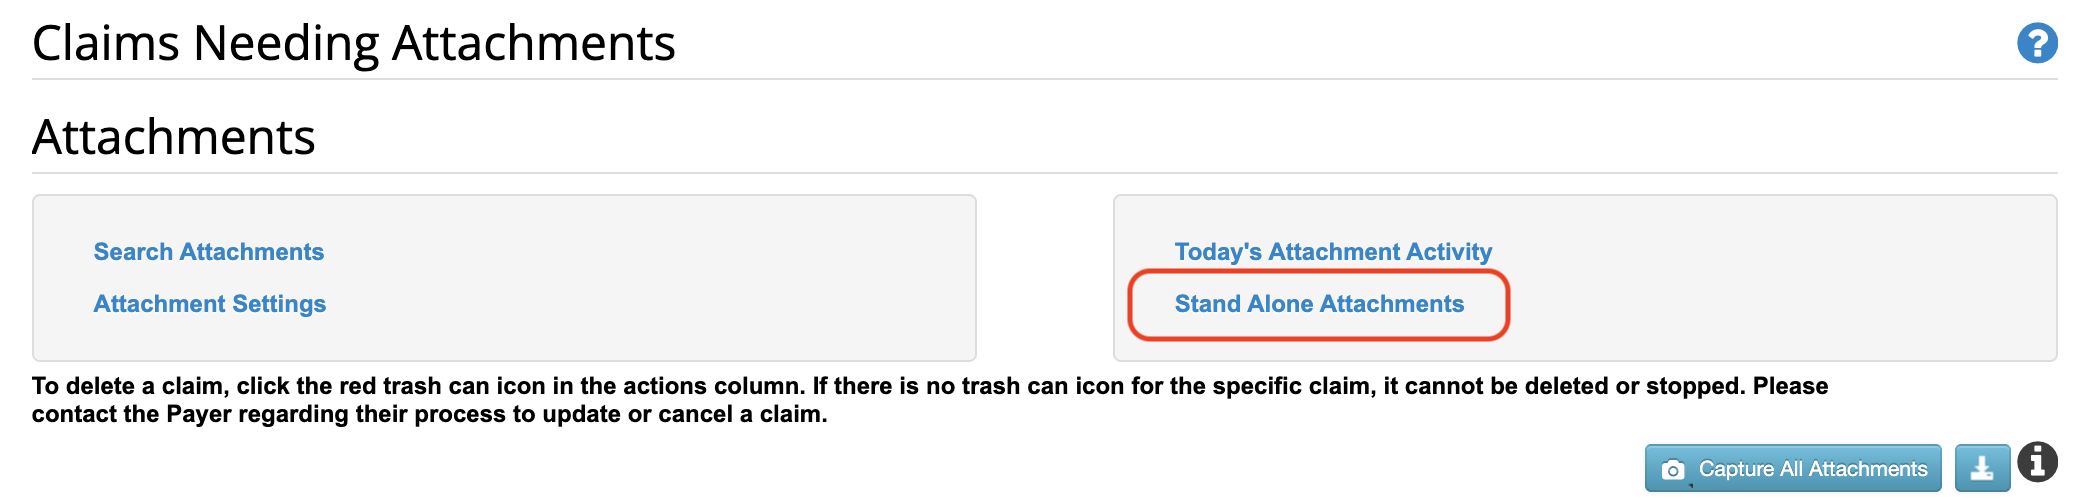
Click Stand Alone Attachments.
- Complete the Stand Alone Attachment details.
- The information about the subscriber and patient MUST match the details exactly how they re represented in Tops. Extra characters or spaces and any variations in the name will prevent the attachment claim from sending.
-
UPDATE: We have been informed by DentalXChange to not input anything in the Provider ID field on the stand-alone attachment.
To locate the Provider Claim ID required for the stand-alone attachment, go toMatrix>Claimsand locate your claim that requires an attachment.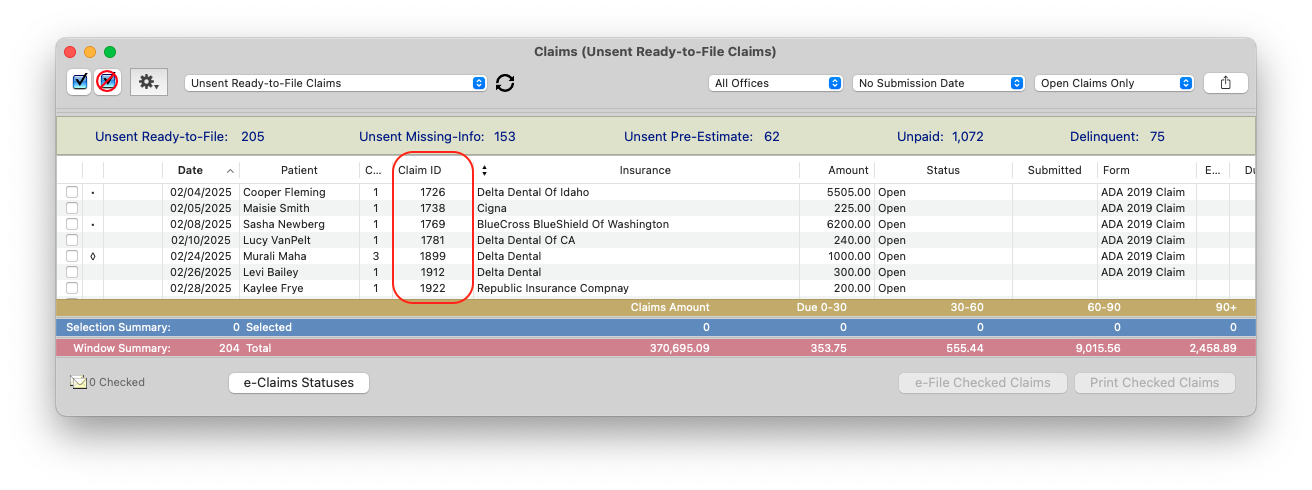
-
Under the Release the Attachment heading, select the radio button labeled When DentalXChange receives my claim.


-
Update: DO NOT ENTER THE PROVIDER CLAIM ID
Enter the Provider Claim ID associated with the corresonding claim in Tops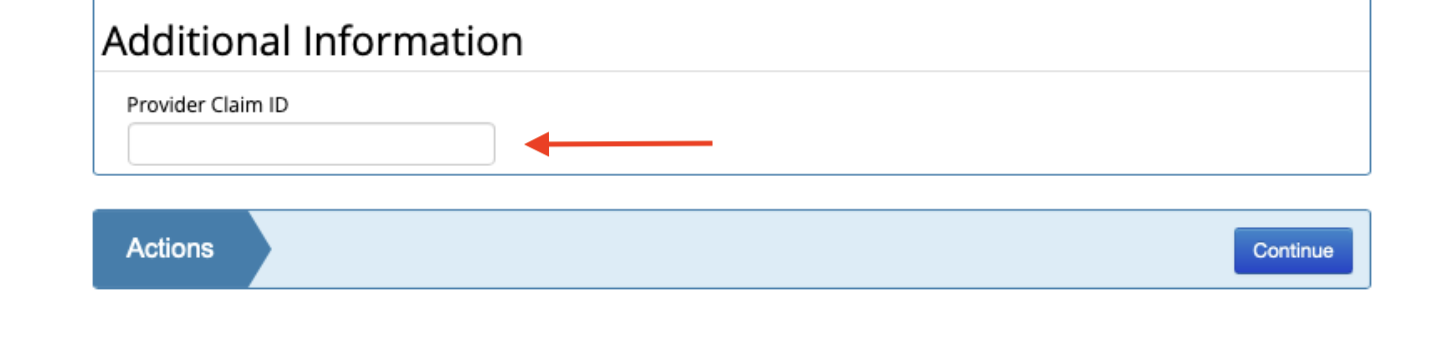
- Click Continue.
- On the next page, select from the following options:
- Add a Narrative
- Upload Image - This button is where you add attachments if not using the Capture Image software feature and identify the type of attachment(s) being included.
- Capture Image - This feature requires the user to download the extension of the software to utliize.
-
IMPORTANT: Make a note of the Attachment ID at the top of the image list.
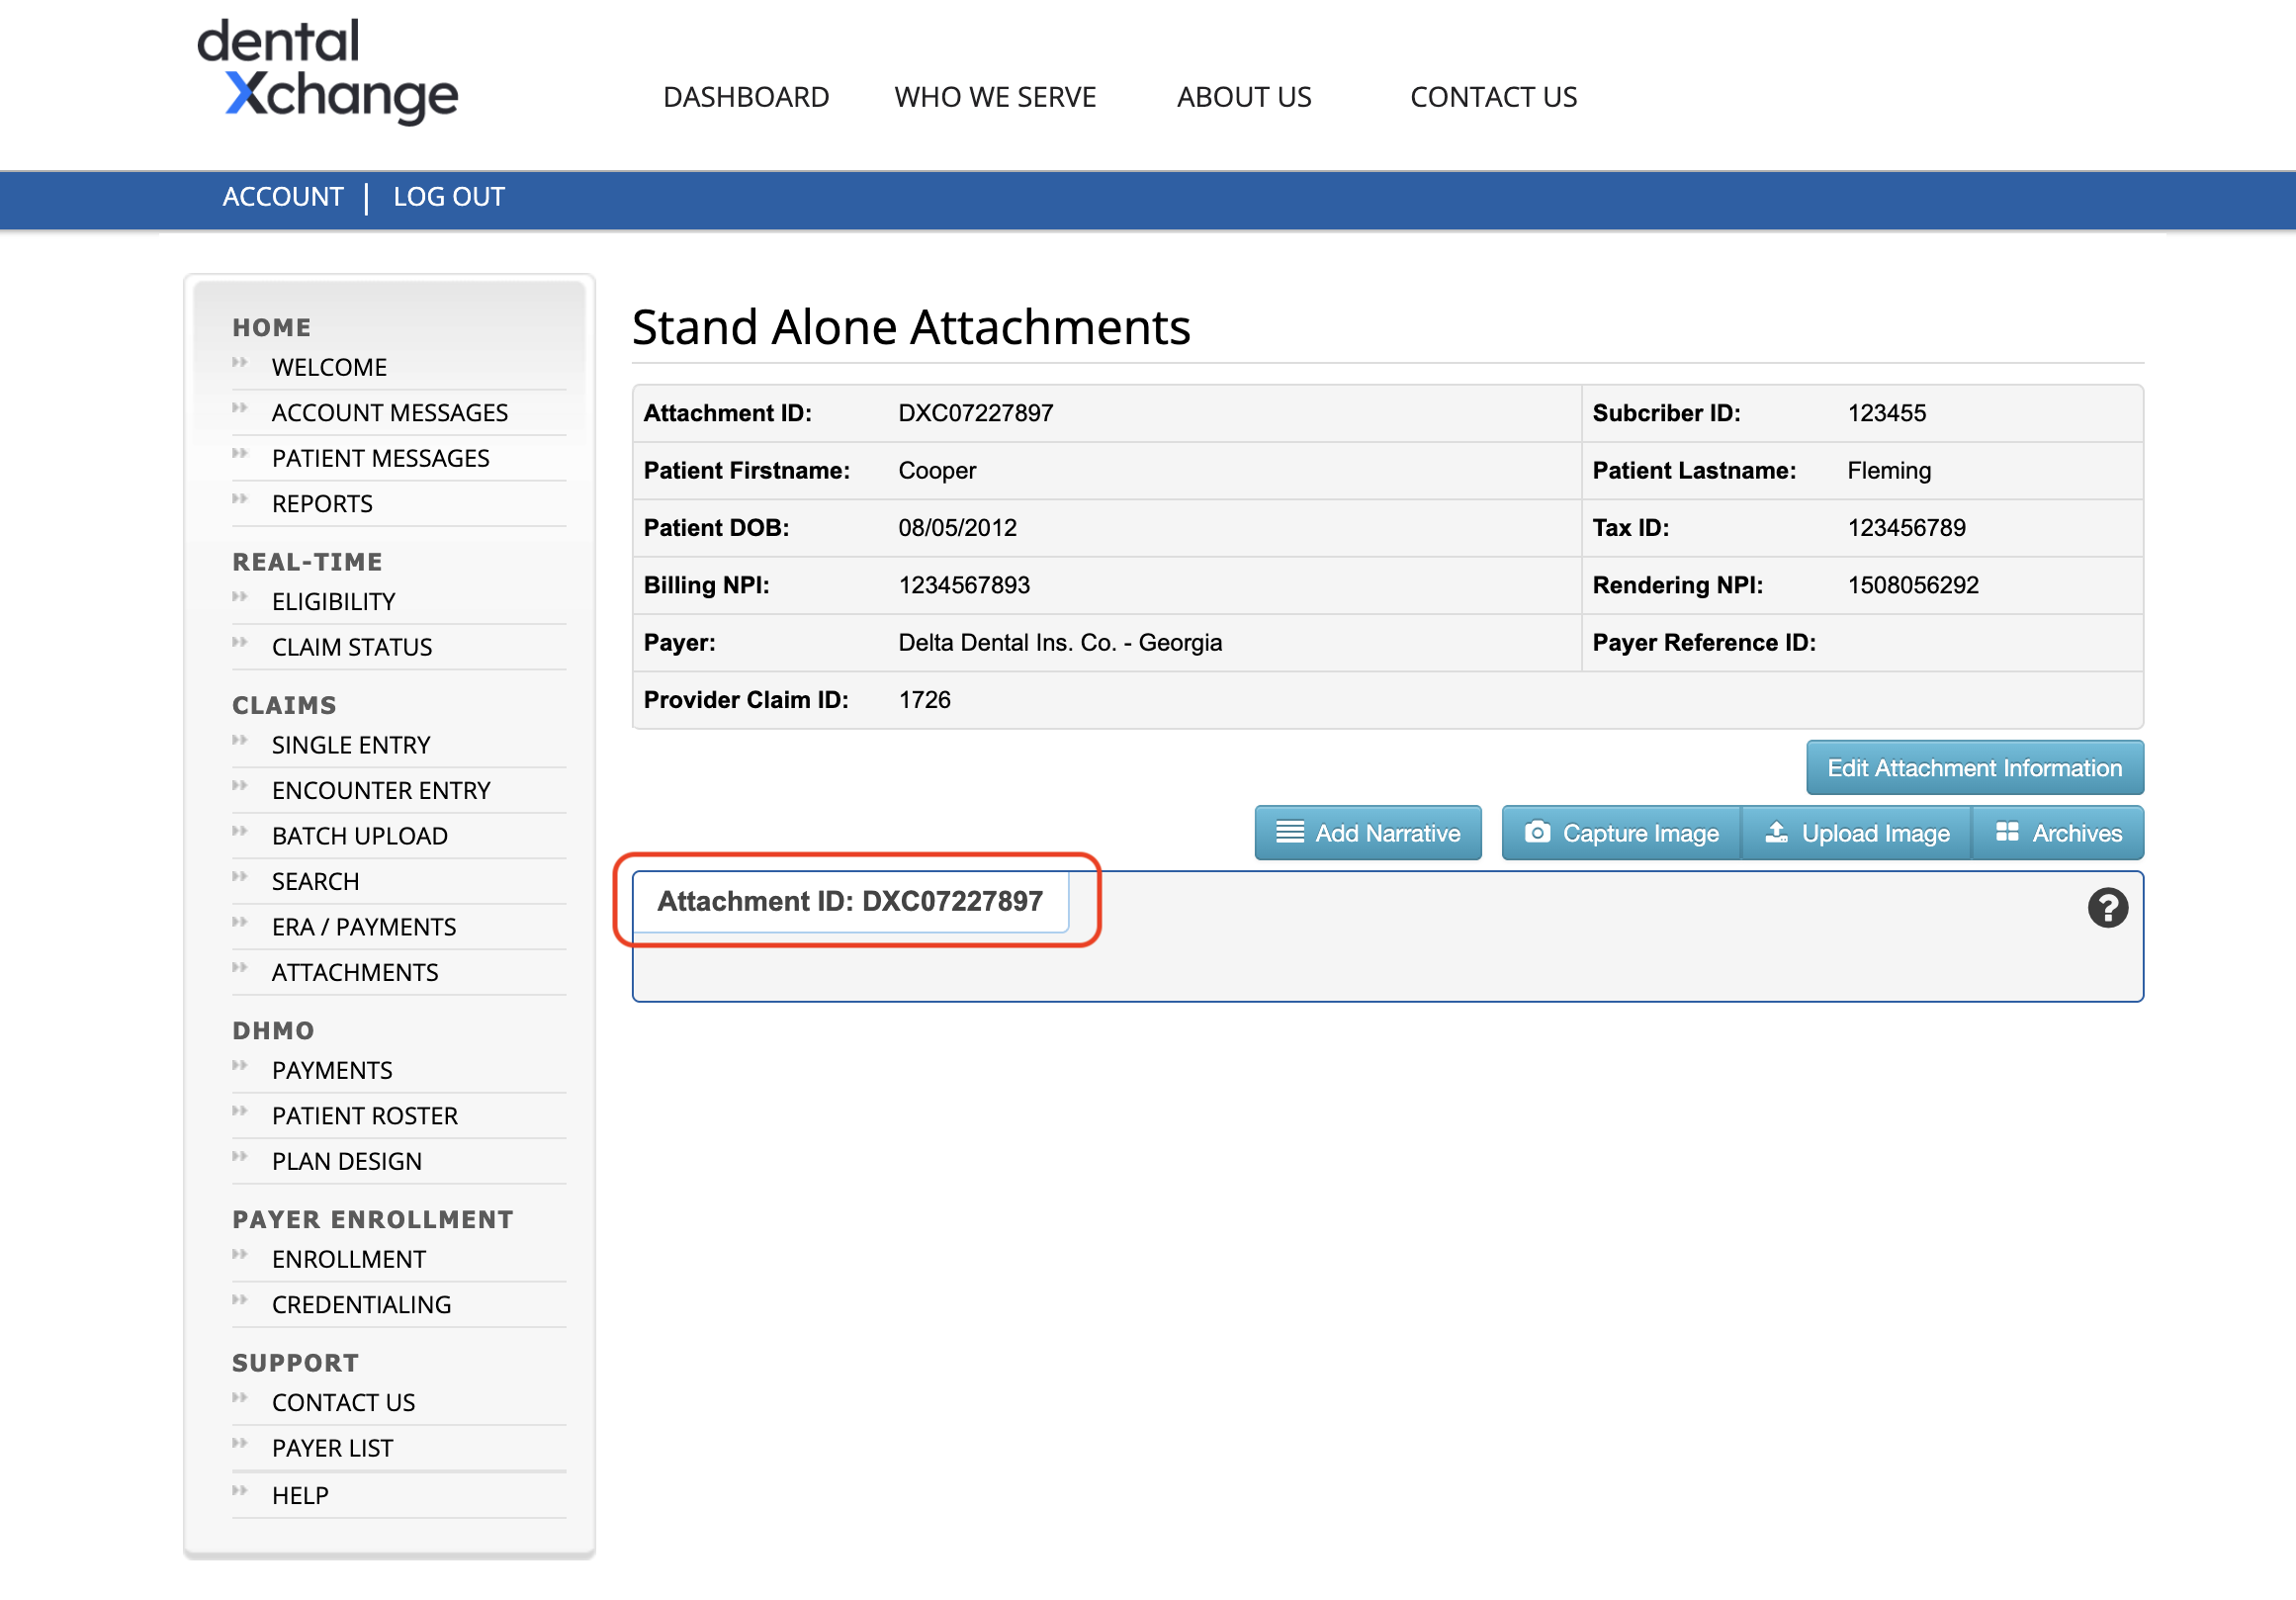
- Click Submit.
-
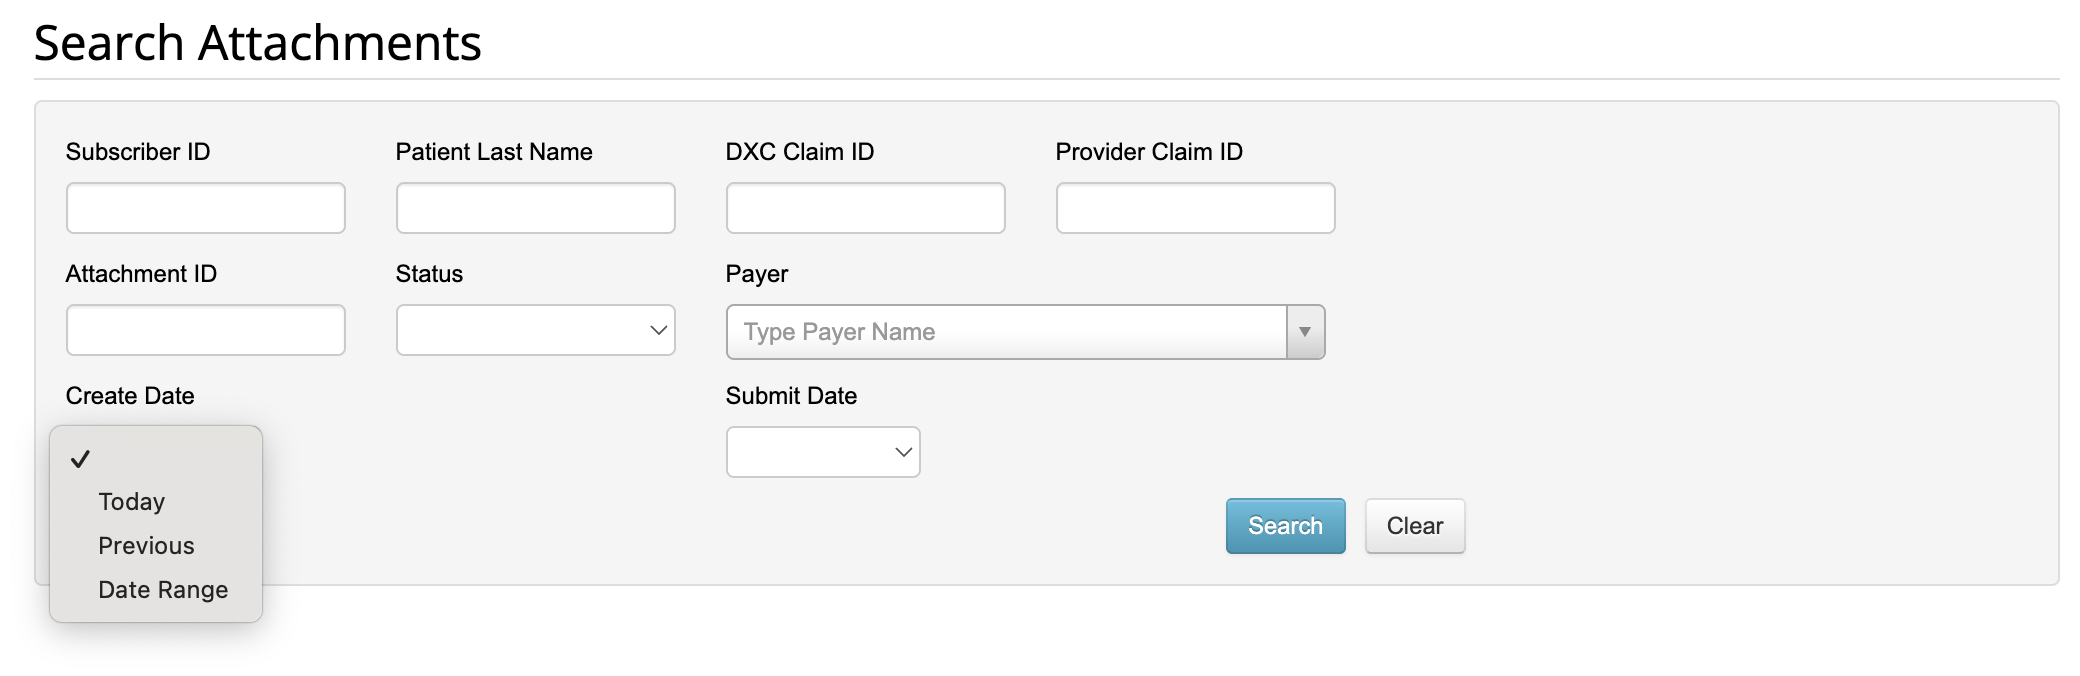
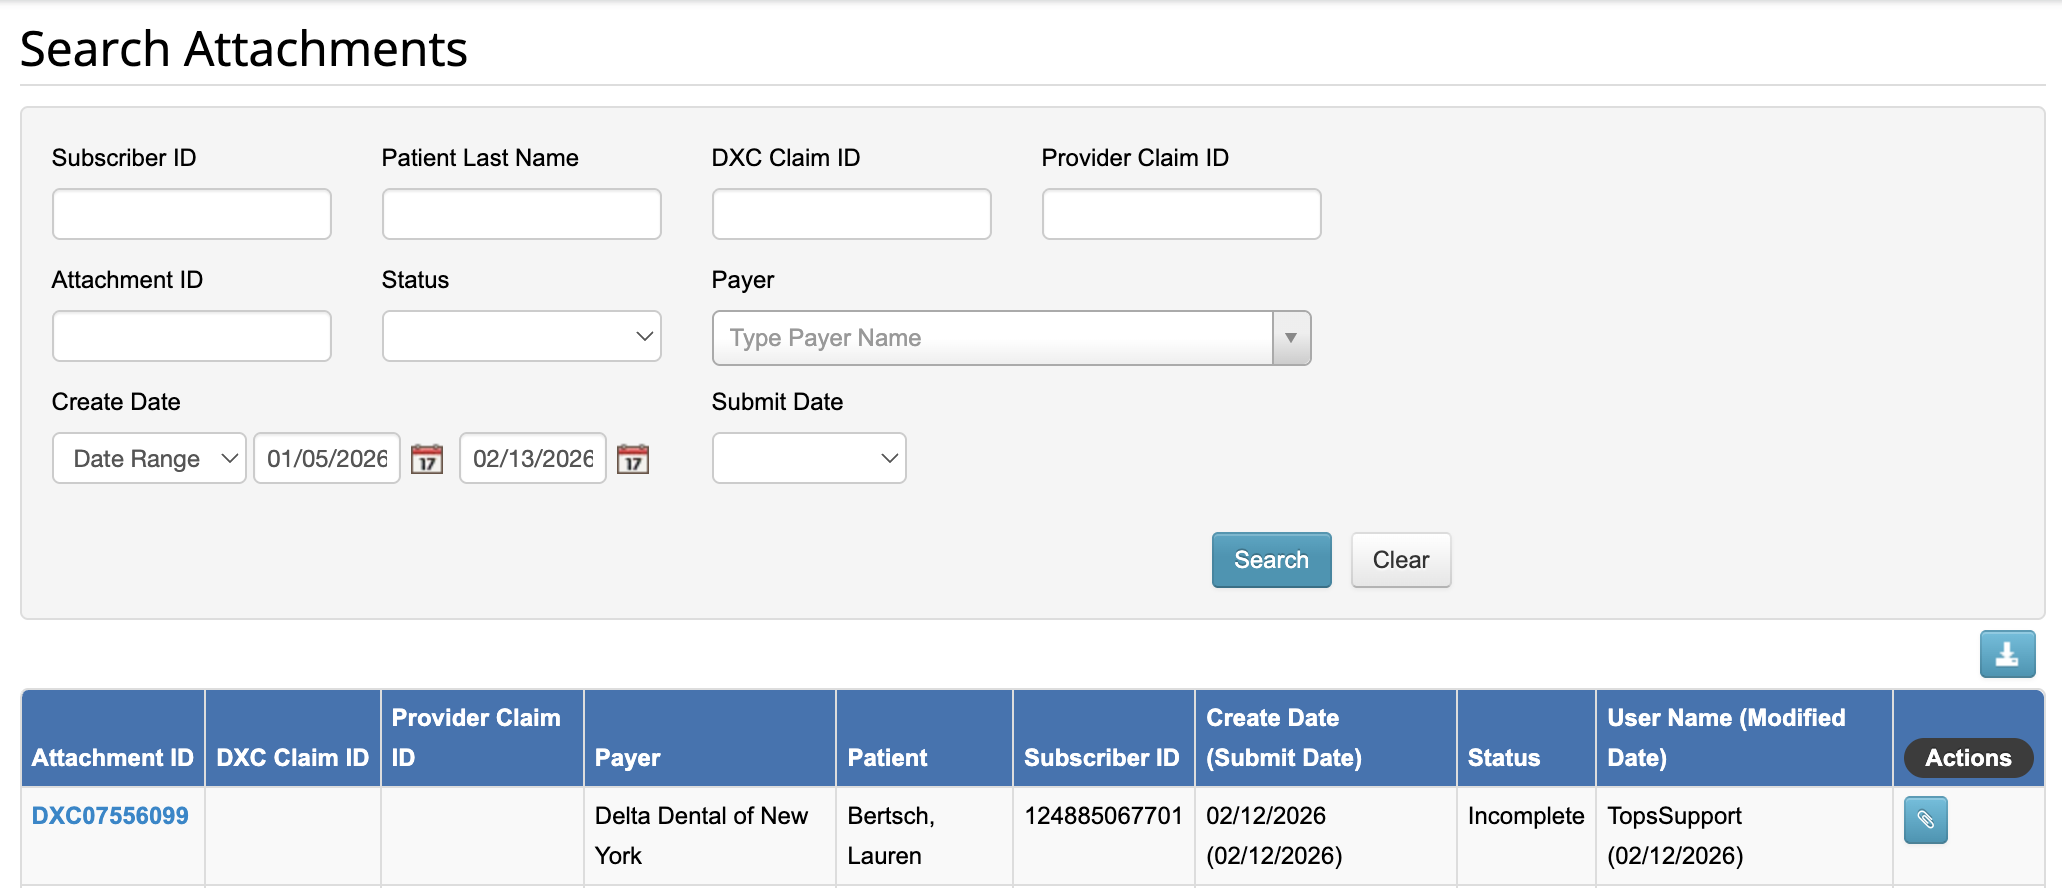
You can view your attachment claim by viewing the Attachments menu again, and clicking on Search Attachments and searching for the patient details, the create or submit date or by payer.


Step 2: e-File the claim in Tops Ortho
- Go to Matrix>Claims> Claims>Unsent Ready to File Claims and locate the claim.
-
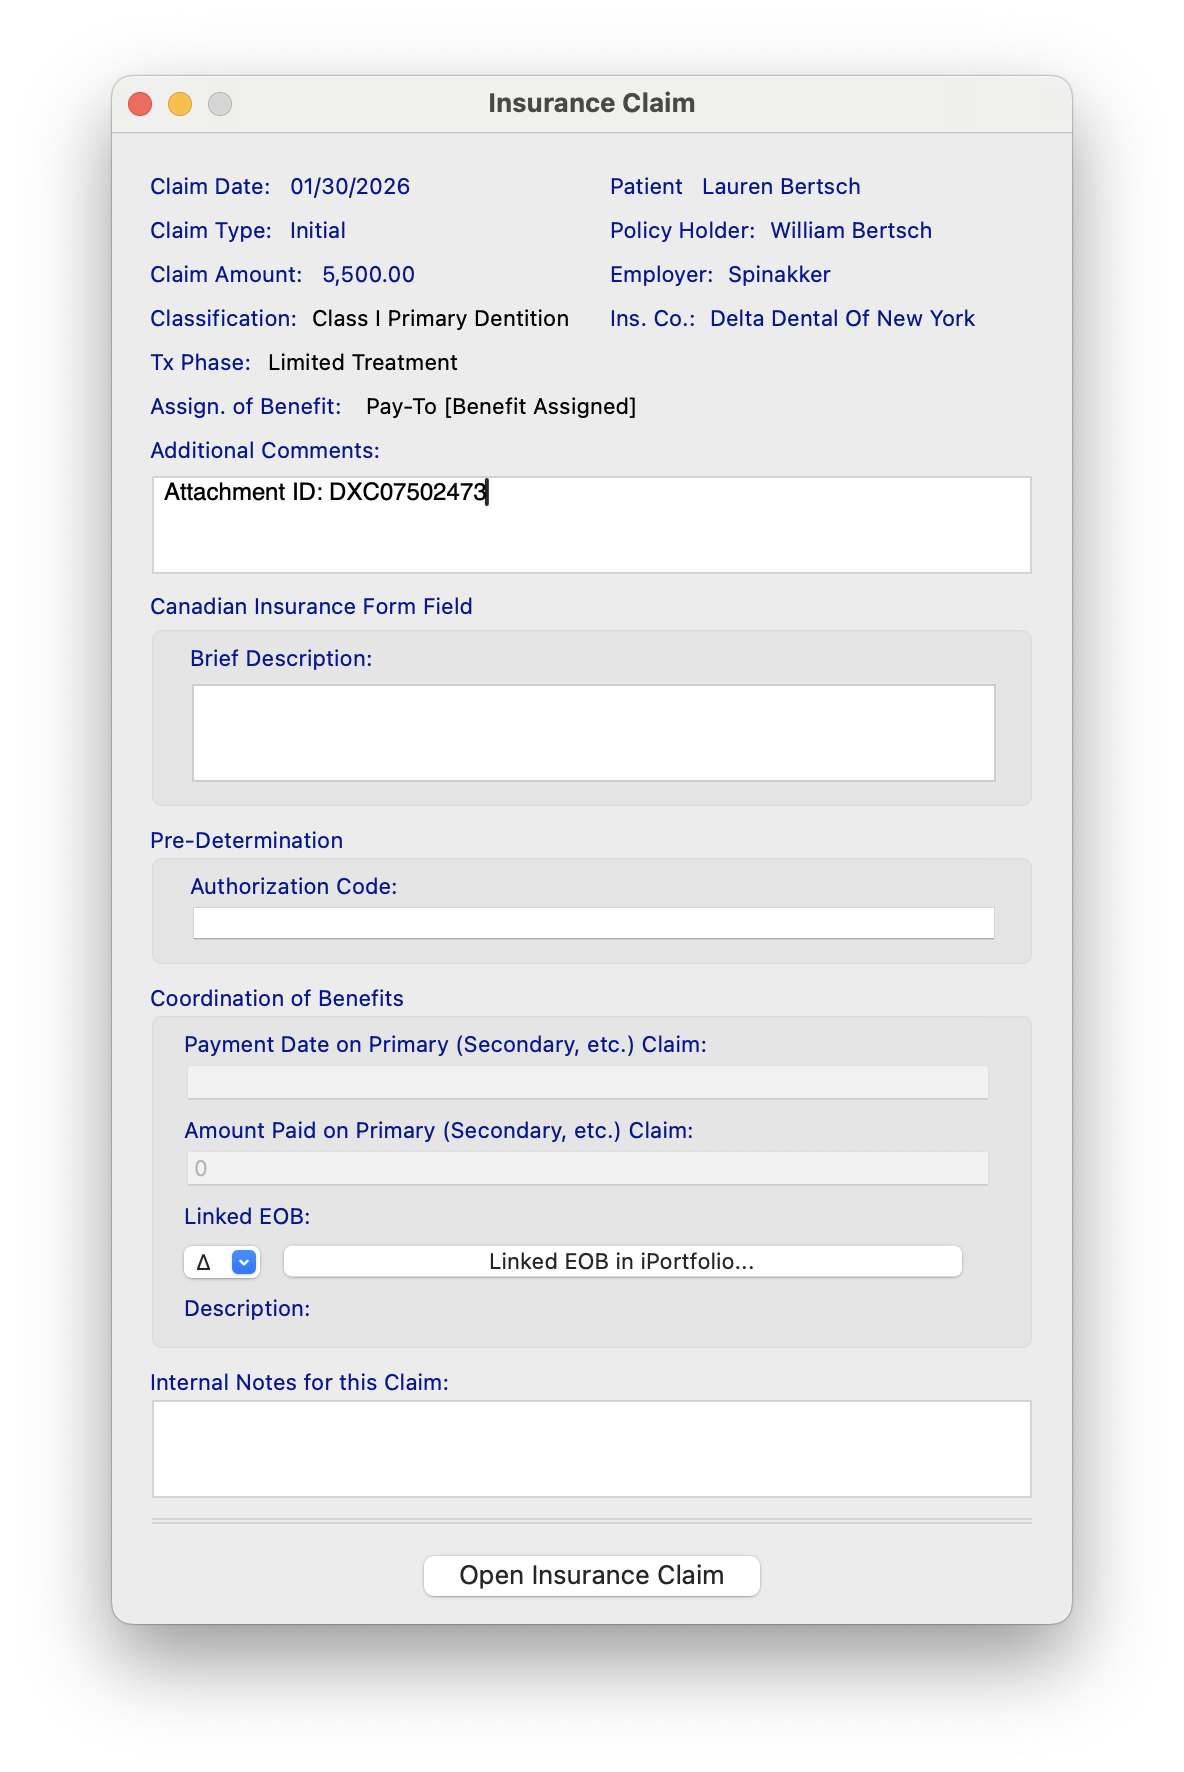
Right-click the claim and select Edit Claim. Enter the Attachment ID in the Additional Comments field.
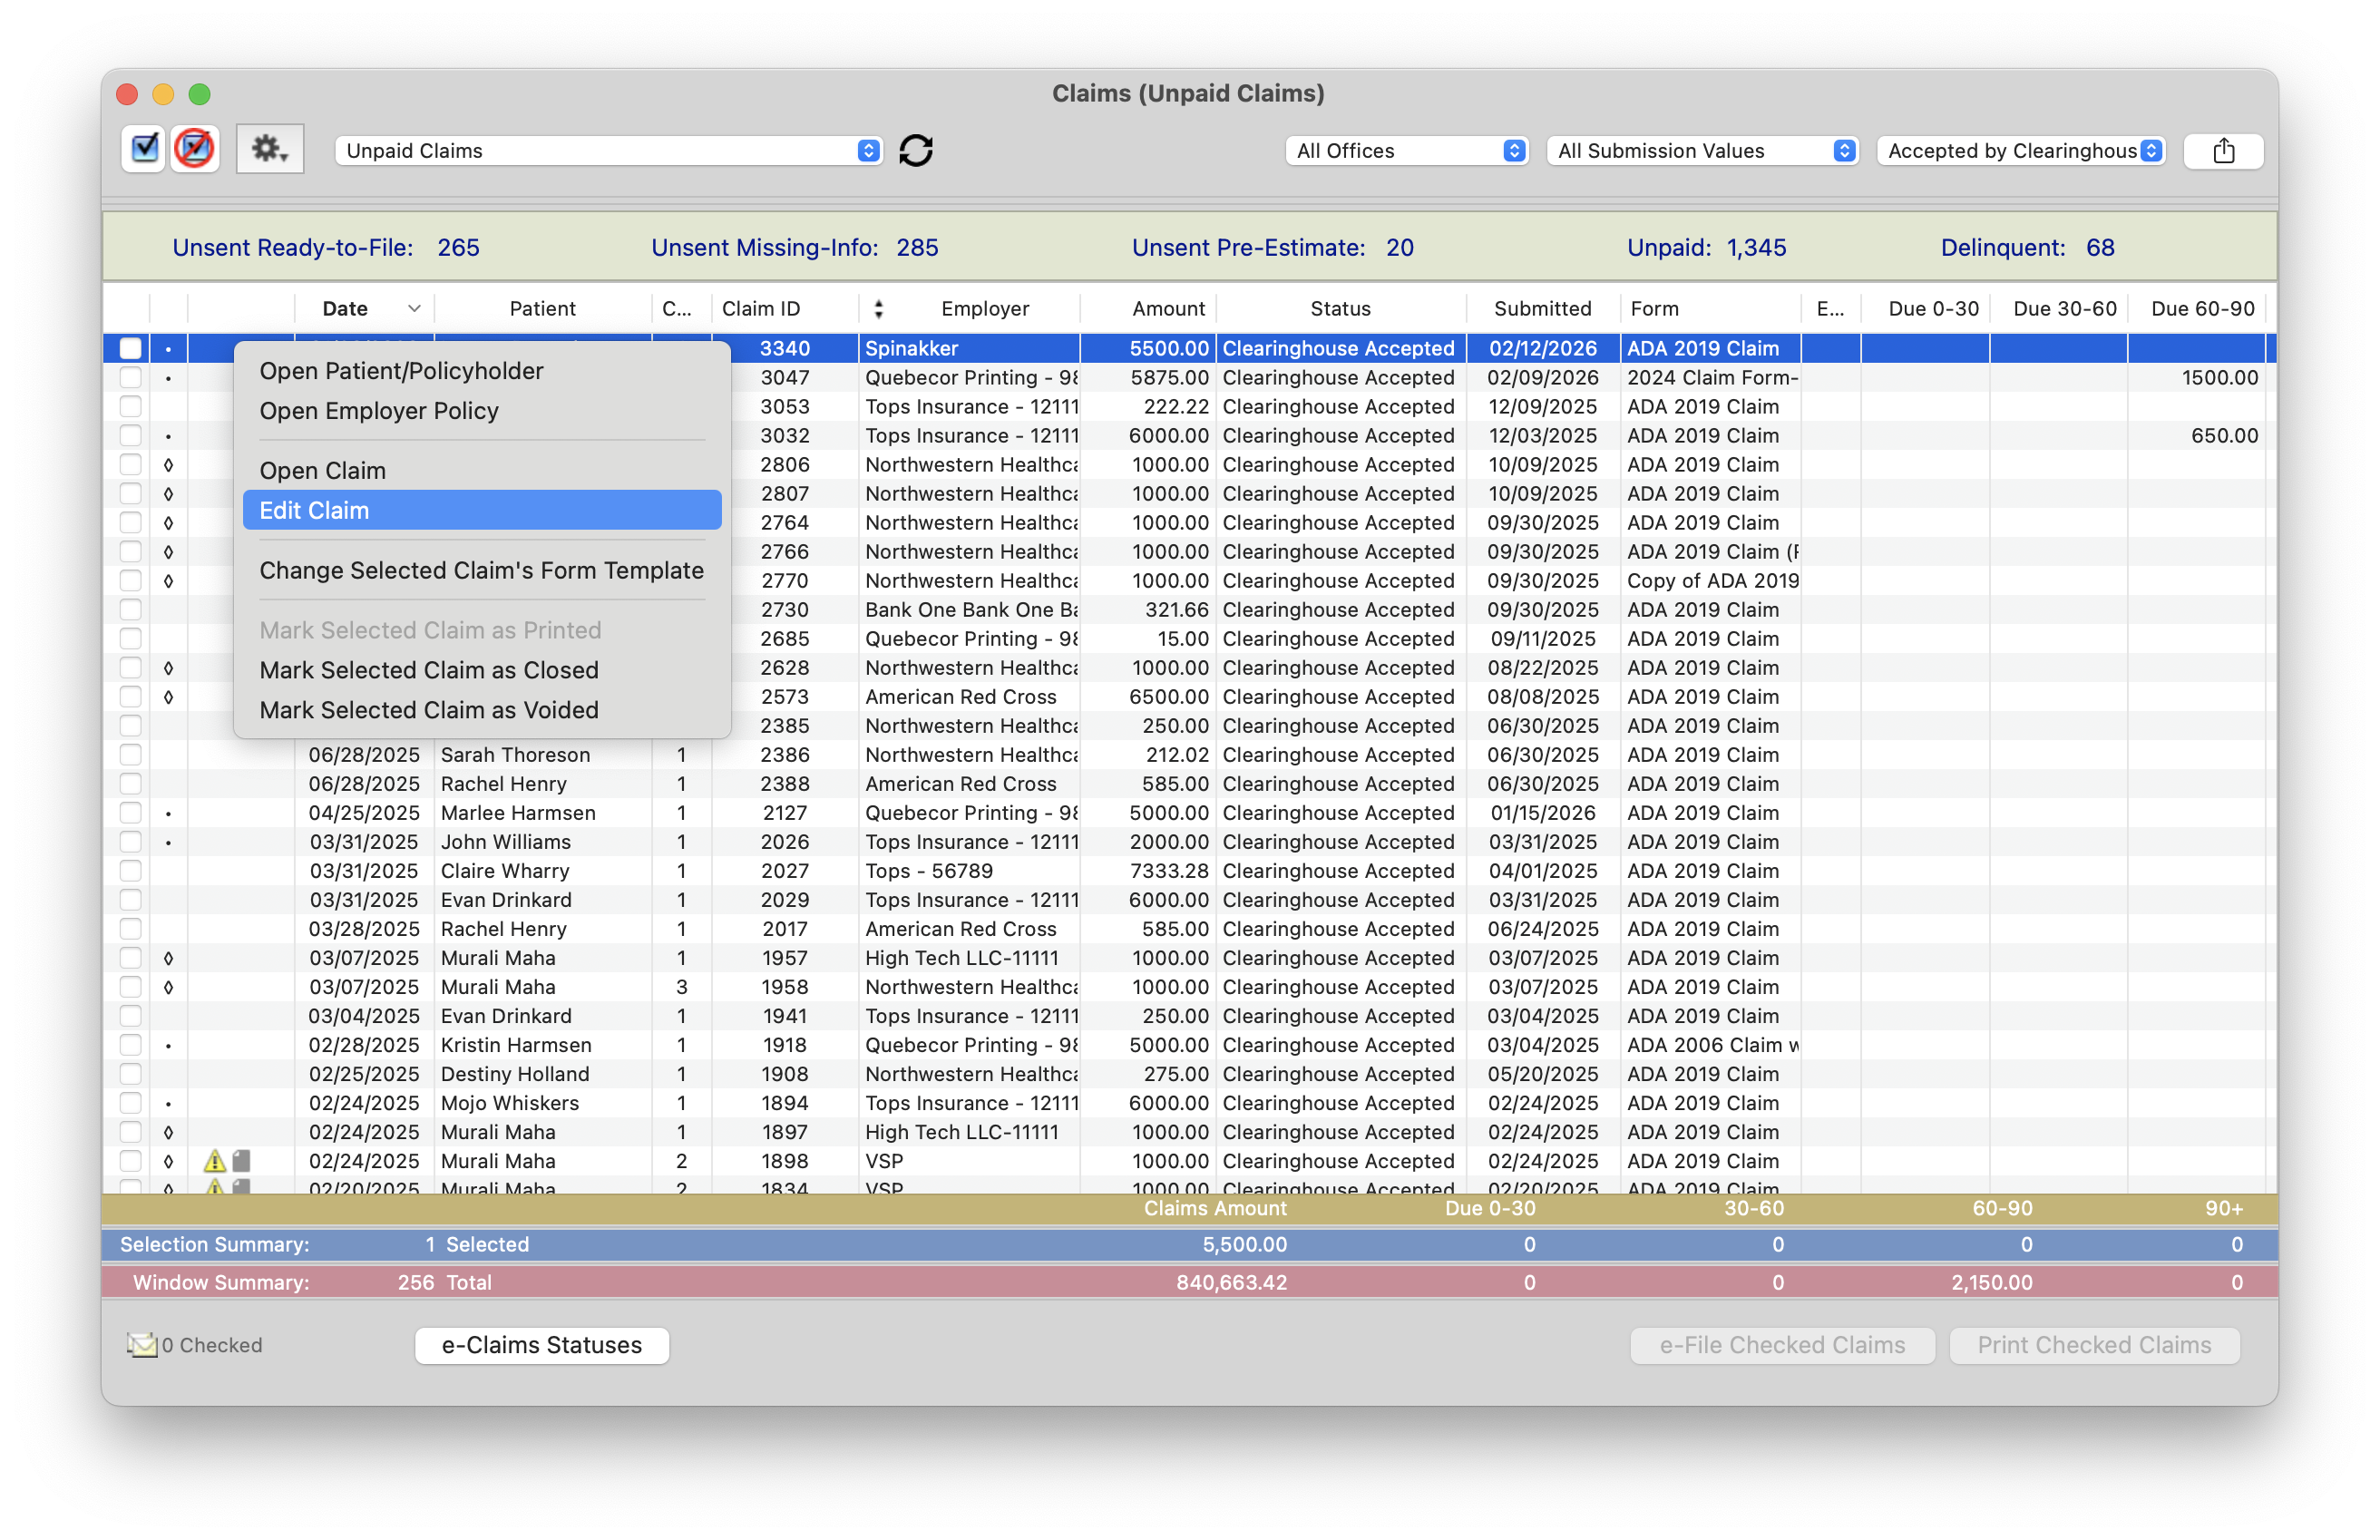

- Place a checkmark in the box to the left of the claim.
- Click e-File Checked Claims.
- If your Tops Ortho claim reflects a Clearinghouse Accepted status, it means that DentalXChange has received the patient's claim and will begin the submission process to the payer.
- Make sure to follow the status of the claim in DentalXChange!
-
If all information from the claim e-filed from Tops matches the stand-alone attachment claim, DentalXChange will send the attachment claim separately, which should reflect a Complete status when sent. Below is an example of an Incomplete status.
Incomplete Status


Step 1: Create the attachment in DentalXChange
- Log in to DentalXChange: https://register.dentalxchange.com/reg/login?0 or go to Matrix>eClaim Statuses
- Navigate to the Dashboard.
-
From the Claims menu, click Attachments.
-
Click Stand Alone Attachments.
- Complete the Stand Alone Attachment details.
- The information about the subscriber and patient MUST match the details exactly how they re represented in Tops. Extra characters or spaces and any variations in the name will prevent the attachment claim from sending.
-
Under the Release the Attachment heading, select the radio button labeled When DentalXChange receives my claim.

- Enter the Provider Claim ID
- To locate the Provider Claim ID required for the stand-alone attachment, go to Matrix>Claims and locate your claim that requires an attachment.


- Click Continue.
- On the next page, select from the following options:
- Add a Narrative
- Upload Image - This button is where you add attachments if not using the Capture Image software feature and identify the type of attachment(s) being included.
- Capture Image - This feature requires the user to download the extension of the software to utiize.
-
IMPORTANT: Make a note of the Attachment ID at the top of the image list.
- Click Submit.
-
You can view your attachment claim by viewing the Attachments menu again, and clicking on Search Attachments and searching for the patient details, the create or submit date or by payer.
-
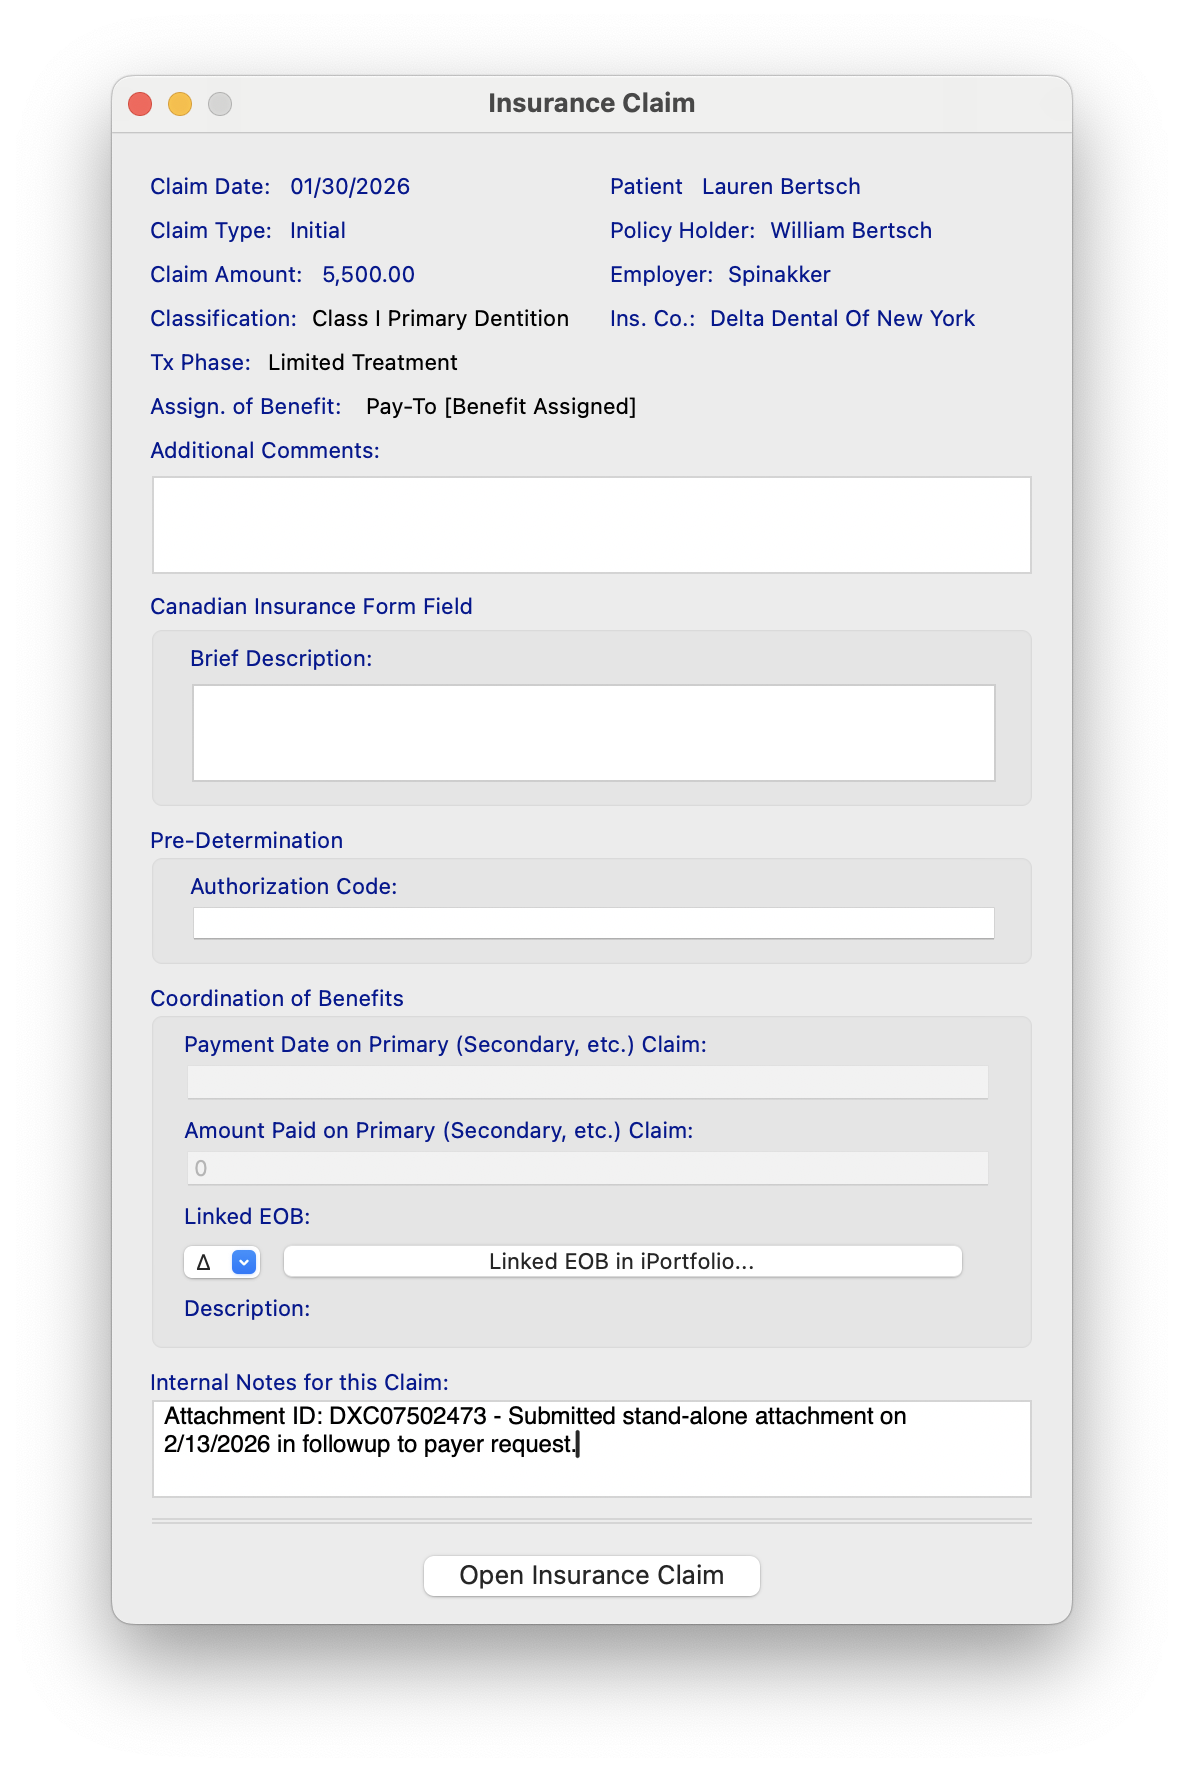
Make an internal note on the claim in Tops referencing the Attachment ID from DentalXChange.

Edit a submitted claim in DXC to add an attachment or Add an Attachment to a Rejected Claim
- Once the claim has been received and adjudicated by the Payer, the claim is available to edit and resubmit directly from within the DentalXChange portal. To locate a submitted claim in DentalXChange, locate the Claim ID from the Tops Claims Matrix.

2 Search for the Provider claim ID in DentalXChange.

-
Click the Claim ID to preview the Claim


-
If it has not had time to adjudicate with the payer, you will see this message:
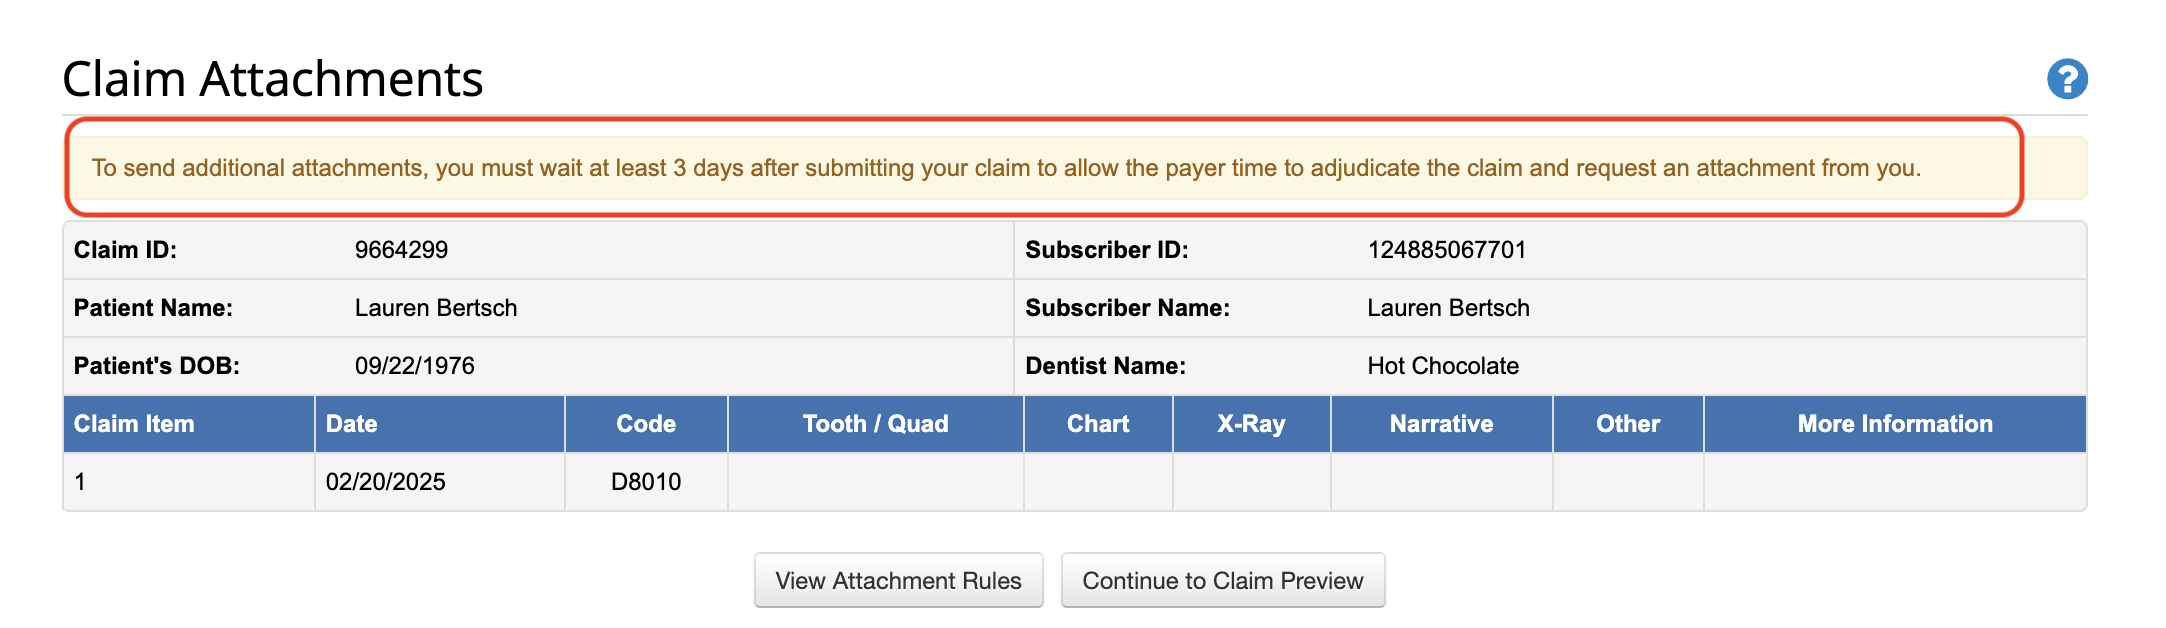
-
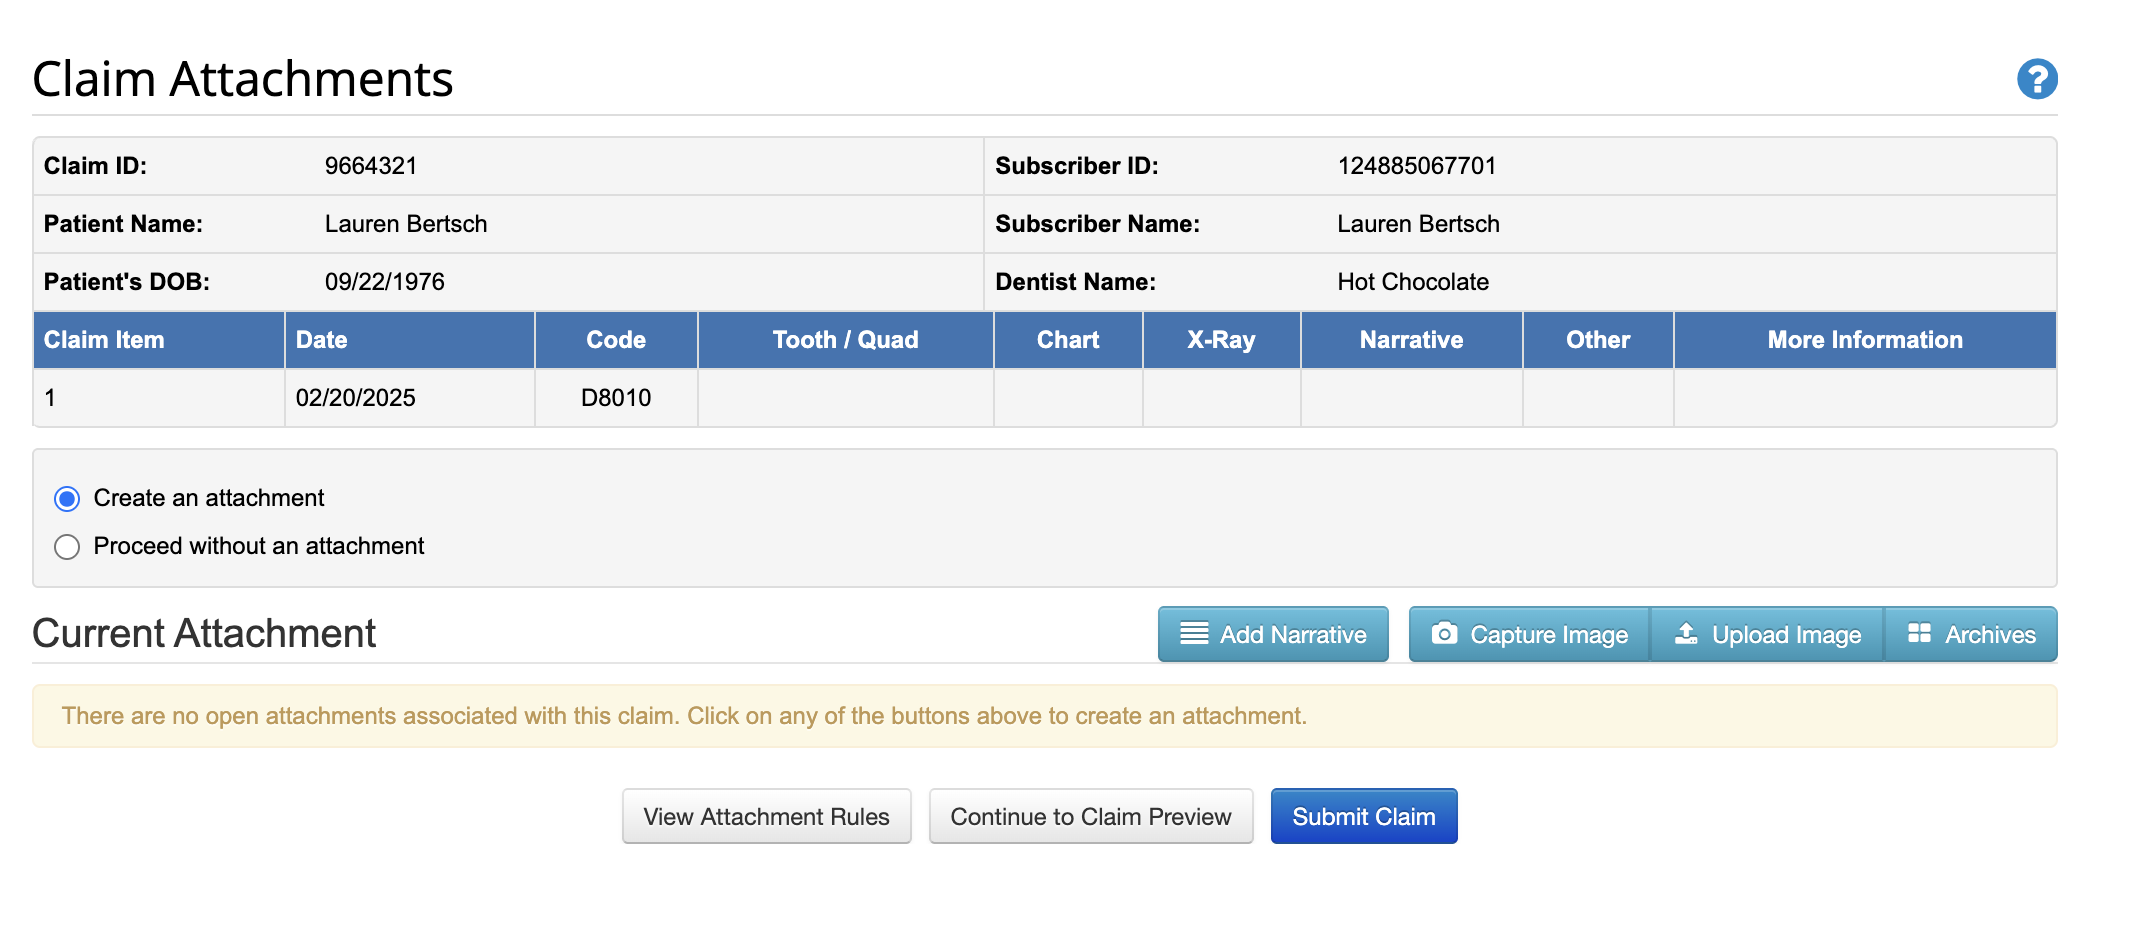
At the bottom of the Claim Review page, click Manage Attachments or Edit to Resubmit. Depending on the payer, you may see different options available to add your attachments.

-
Click the radio button next to Create an Attachment and add the required attachments using Add Narrative, Capture Image or Upload Image. The Upload Image option will allow you to upload multiple documents and images directly from your workstation.
-
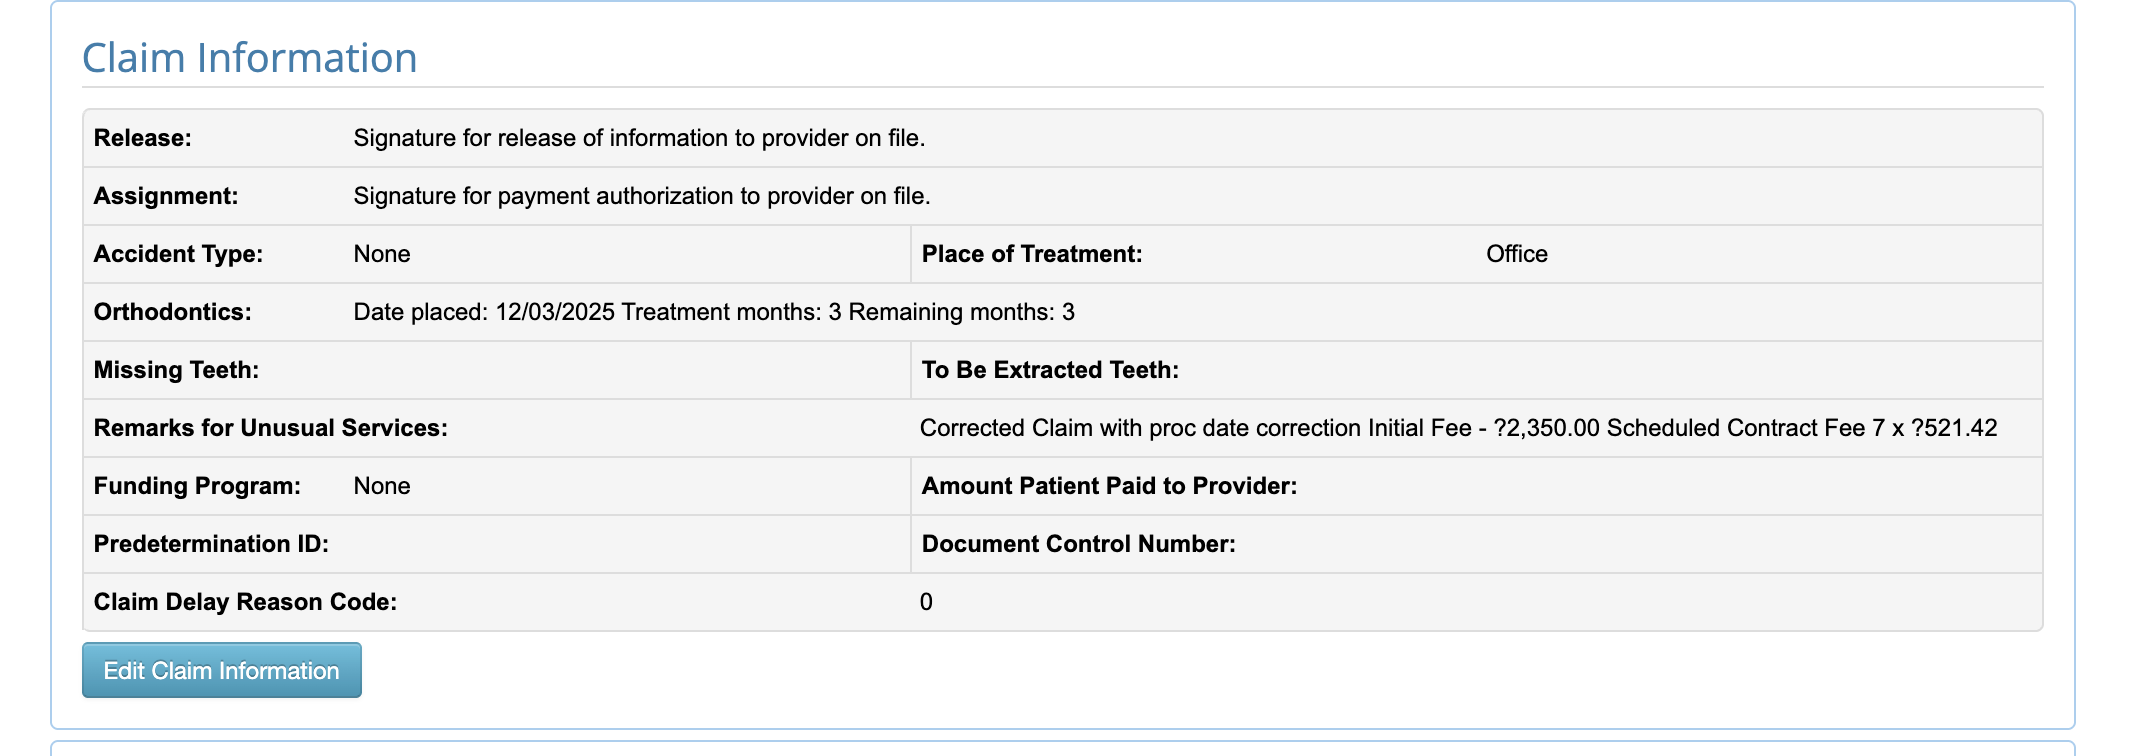
In the Claim Information section, click the button to Edit Claim Information
-
Add in the Remarks field that the claim has been corrected to include attachments. Click Save when done.


Note: If you are responding to an EOB stating that the claim was rejected due to missing attachments or needing additional information, click the + symbol to expand the Misc section and enter the EOB # in the Document Control Number field. Click Save when done.

- Click the Submit Claim button.
-
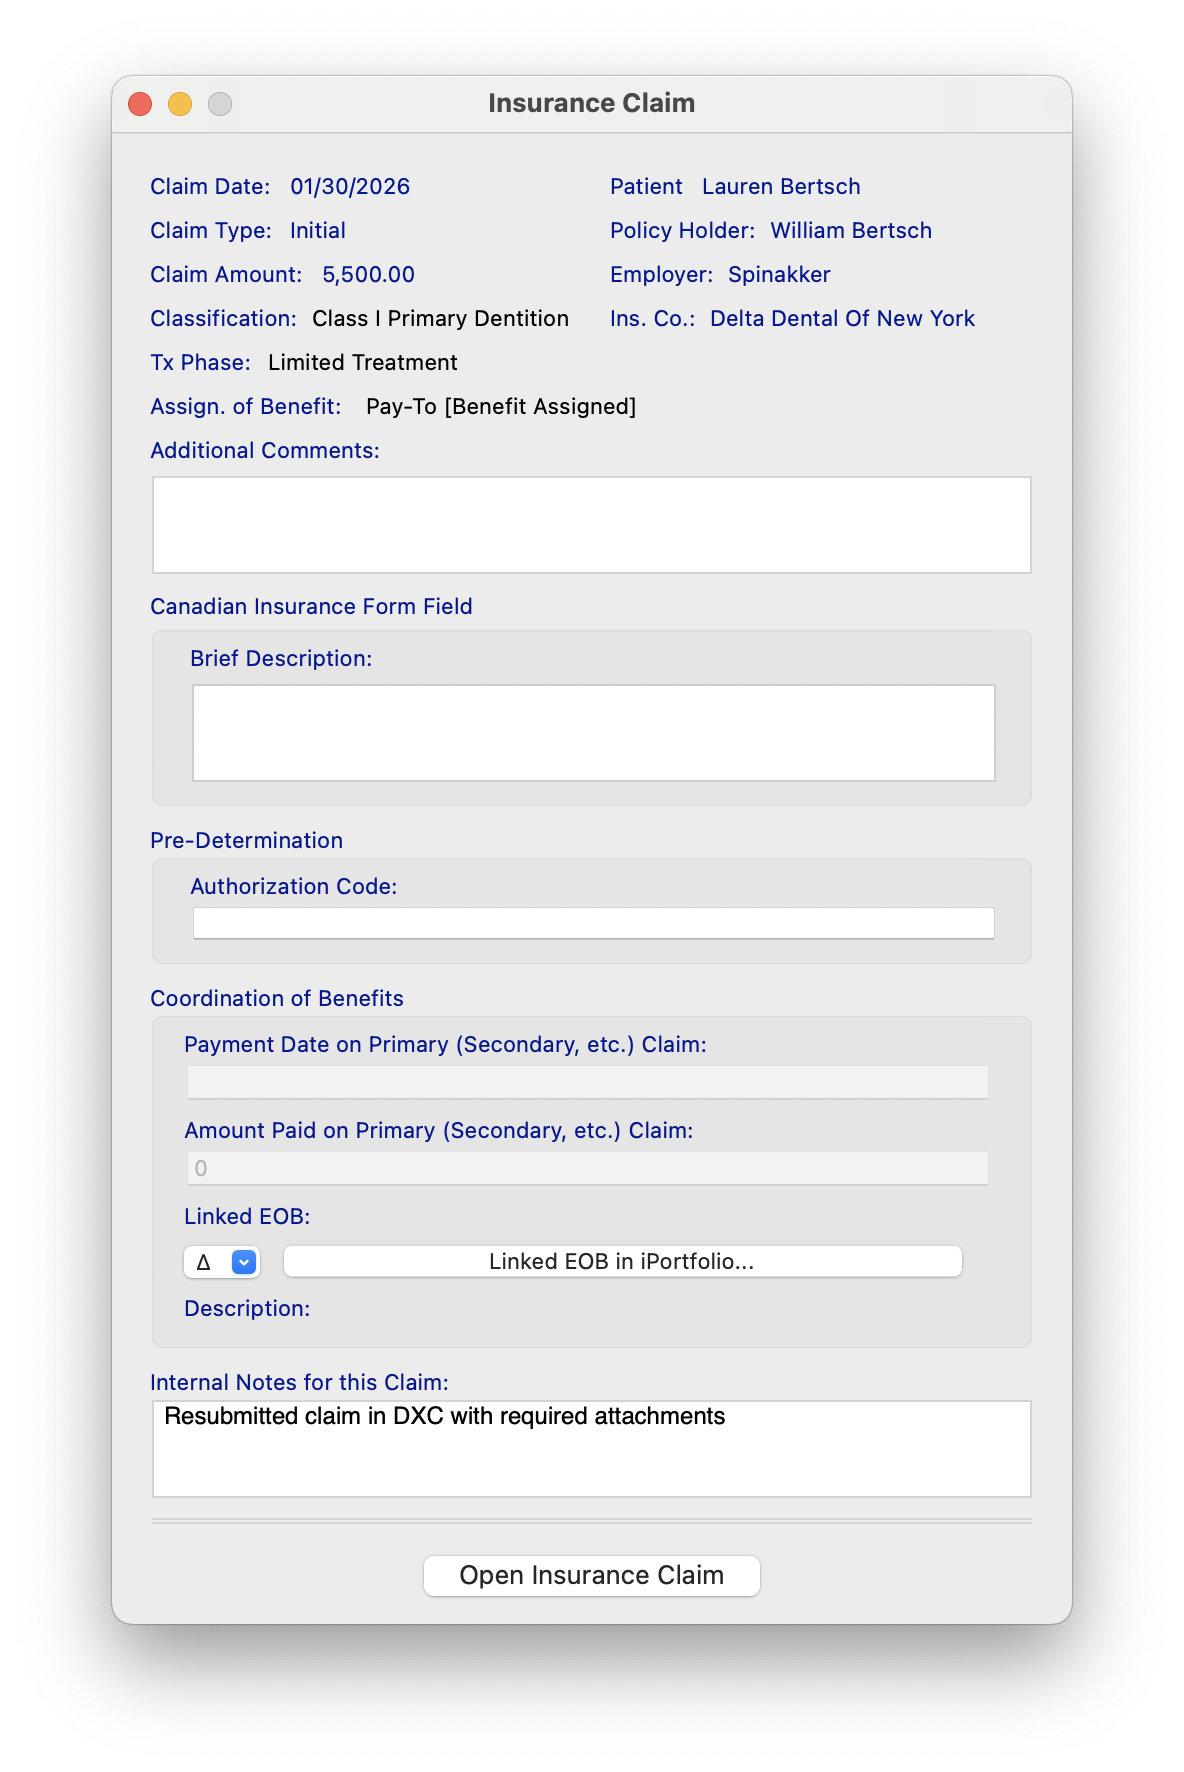
Edit the claim in Tops to note that the claim was resubmitted directly in DentalXChange with attachments.