
Ending the Day
Ending the Day
Before leaving for the day, take a few minutes to reconcile your financial activity, complete outstanding clinical tasks, and prepare your practice for tomorrow. Following a consistent end-of-day workflow helps ensure patient records are complete, payments are reconciled, appointments are scheduled, and nothing is overlooked before daily rollover.
While financial reconciliation is a critical part of closing the day, it’s equally important to verify patient flow, treatment documentation, communications, and scheduling.
Financial Day Sheet:
The Financial Day Sheet is your audit trail for the day. It lists every financial transaction—including charges, payments, adjustments, refunds, and voids—that occurred on the selected date.
Do the payments on the Financial Day Sheet reflect what happened in your practice today? You can use this report for verification.
Financial Day Sheet is the perfect list to verify all payments.
- Go to Matrix > Financial Day Sheet.
- Today's date will fill in by default on the top left; to review a past day, double-click this field and enter the date.
- From the upper right-hand corner, place a checkmark on the Show voided checkbox.
- Review all transactions for accuracy.
- Void the payments that you determined you had not received when you reviewed the Deposit Slip. See related article, Void a Transaction.
- Click the Type heading to group like transactions together.
- Highlight all Cash/Check transactions; note the total on the blue Selection Summary at the bottom of the report.
- Highlight all Credit and Debit card transactions; note the total on the blue Selection Summary at the bottom of the report.
- Highlight all Bank Draft transactions; note the total on the blue Selection Summary at the bottom of the report.
- Reopen the Deposit Slip (Matrix > Deposit Slip).
- Compare these three amounts:
- The totals on the Financial Day Sheet.
- The totals on the Deposit Slip.
- The totals of the cash, checks, credit/debit card receipts you have on hand, as well as the direct deposit totals on the practice bank statement.
Deposit Slip
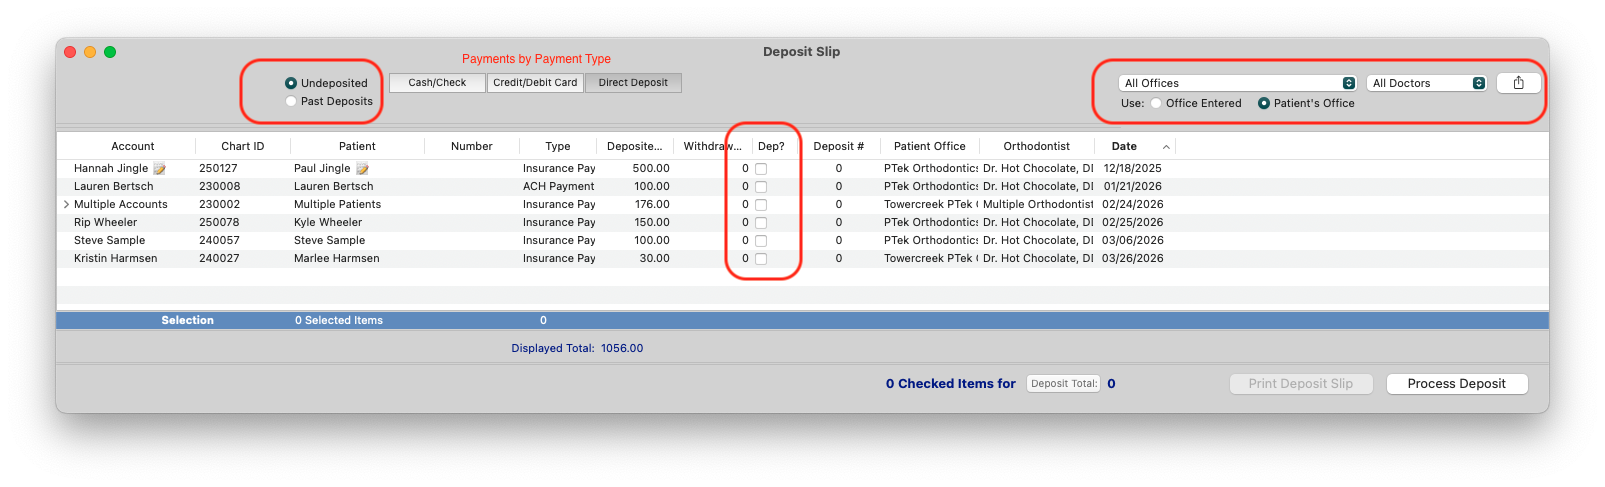
The Deposit Slip shows all money undeposited, divided in tabs by payment type (check, cash, credit, debit). It displays all payments that have not yet been deposited and allows you to reconcile the payments your practice actually received.
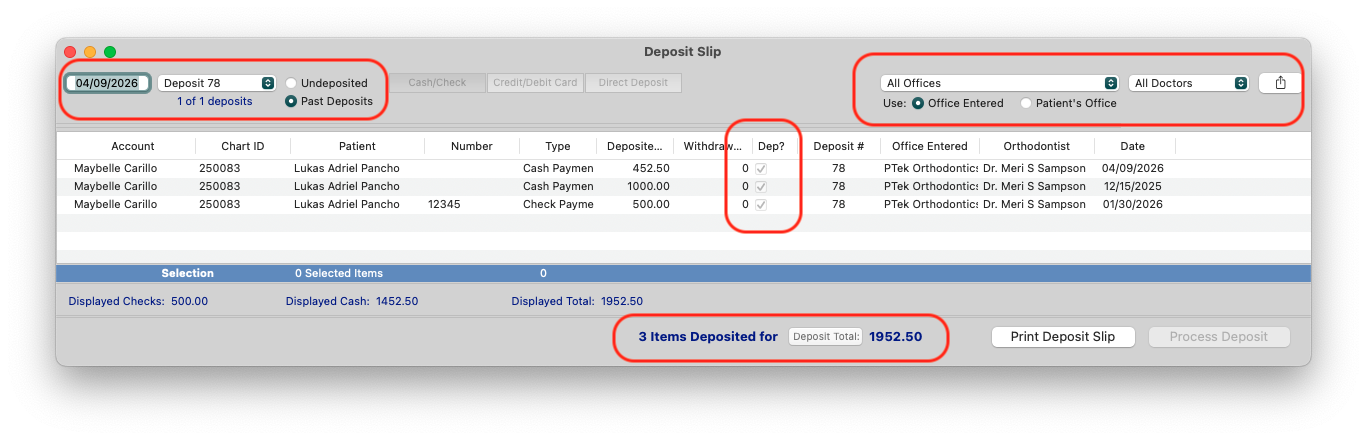
The Deposit Slip can also reflect all payments deposited by date and by batch (Deposit ID). To identify batched deposits and review the payment details, select the Undeposited radio button, update the date, and use the drop-down menu to select the Deposit ID. Additional filters include Office, Doctor and reflecting the patient's office or the office where the payment was entered.
Viewing your Deposit Slip
- Go to Matrix > Deposit Slip.
- Payments will display by the categories of Cash/Check, Credit/Debit Card and Direct Deposit.
- Click the Type heading to group all like payment types.
- Move down the list and verify the following:
- All cash and checks are present.
- All credit/debit cards processed successfully.
- All direct deposits were successful.
- Only mark the Dep? box for payments that were received by the practice. TopsPay payments cannot be marked as deposited. Please see the auto-reconciliation note below.
- When you are done, click Process Deposit.
-
Any payments that were not actually received, such as missing checks or declined credit card payments, will need to be voided from the Financial Day Sheet. See the related article, Void a Transaction, below.
In the example deposit slip below, the payments for patients Anna Katherine and Amy were declined. Therefore, the practice did not check off the payments for deposit.

Non-TopsPay Payments
Whatever your protocol for depositing funds, you will use the deposit slip for reconciling non-TopsPay transactions.
- Money is given to your practice as payment for services. The Financial Day Sheet displays all payments that you posted to ledgers today. The deposit slip will show money that you need to reconcile as successfully processed or collected.
- The Deposit Slip shows all money undeposited, divided in tabs by payment type (check, cash, credit, debit).
- For non-TopsPay transactions, use the deposit slip to verify that you deposited the money and place a checkmark in the Dep? column
- Click the Process Deposit button in the lower right-hand corner of the Deposit Slip window.
- The selected and deposited payments can be viewed as a Past Deposit from the Deposit Slip or by access Reports>Deposit.
TopsPay transactions are automatically reconciled. Once Stax confirms that the funds have been settled and transferred to your bank account, Tops automatically marks those payments as deposited. Until funding occurs, TopsPay transactions remain on the Deposit Slip as Undeposited and cannot be manually checked or processed.
TopsPay Payments
- Deposit Slip: Auto reconciliation
- Tops will automatically deposit the TopsPay transactions once Tops receives confirmation from Stax the payment has been funded.
- If TopsPay payments are on your Deposit slip as undeposited, they have yet to be funded and cannot be checked to manually deposit by your staff.
- Once batched and funded, the transactions will automatically fall off the list of undeposited payments and move to a Deposited, Deposit Slip.
- To view any TopsPay deposits from the day, review the Deposit Report. (see below)
Deposit Report
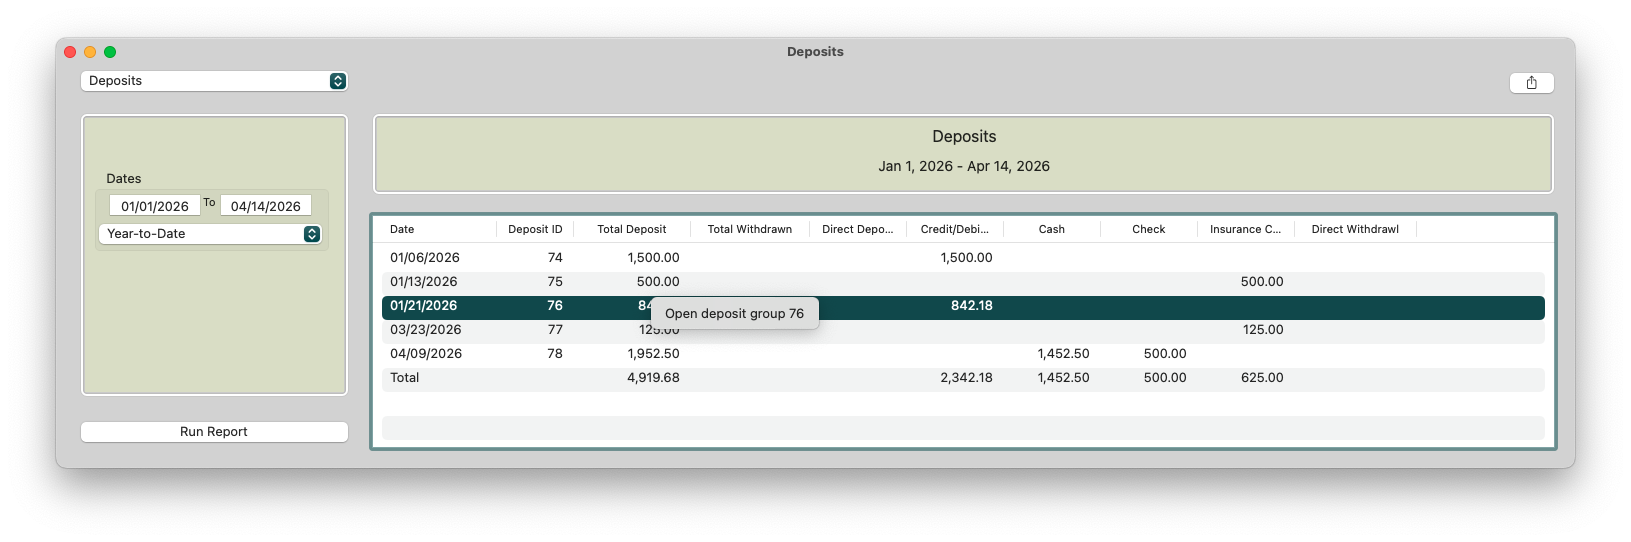
The Deposit Report shows the amounts deposited by deposit ID, date and amounts by type, according to a date range. (Reports>Deposit).
- Use the Deposit Report to reconcile bank records
- Use the Deposit Report to reconcile your TopsPay deposits. To view your TopsPay deposits, go to Reports>TopsPay Portal. From within the TopsPay portal, navigate to Reports>Deposit Report.
- Use the Deposit Report to view all deposit slips that have been deposited.
- The deposit report is a list of all deposited payments, by Deposit ID, across all locations.
- Clicking on a deposit group allows you to expand and view all payments that are part of the deposit.
Manage Patient Flow
Patient Flow tracks a patient’s progress through your practice from check-in to check-out. Keeping patient statuses up to date throughout the day helps ensure a smooth handoff between the clinical and front office teams. Patient Flow should be updated throughout the day-not just at closing-to provide an accurate view of where every patient is in their visit.
As a best practice, clinical staff should mark a patient as Done when treatment is complete and the patient has left the chair. Patients marked as Done signal to the Reception or Scheduling Coordinators that the patient is on their way to the front desk and that the next appointment or recall should be created.
Before a patient leaves the practice, ensure one of the following applies:
- A future appointment has been scheduled.
- A recall has been created for future scheduling.
- If the patient has completed treatment or will no longer be seen, update the patient’s status to Dismissed, enter a Dismissal Date, and select the Dismissed checkbox to archive the patient.
Once the patient has completed checkout, update their status to Checked Out.
If a patient never checks in for their appointment and remains in a Late status, Tops Ortho automatically marks the appointment as Missed during rollover. The missed appointment is placed in the Recall window in the Appointment Book drawer, and a recall is automatically generated using the missed appointment type. The appointment status is also updated to Missed on the patient’s Appts/Recalls tab.
Tip: Not sure whether the patient already has a future visit scheduled? Click the patient’s appointment once in the Appointment Book to open the Appointment Drawer. From there, you can quickly review any future scheduled appointments and open recalls before creating a new appointment or recall.
Manage Treatment Notes
Every patient seen in your practice should have a treatment note documenting the services provided. Treatment notes are saved as part of the patient’s permanent record under Patient Information > Clinical.
Because treatment notes are associated with the date of service, it’s important to verify they have been completed before daily rollover. Once rollover has occurred, a treatment note cannot be created for the previous day.
Tops Ortho provides a Matrix report that allows you to quickly identify completed treatment notes as well as any patients who are missing a note (Matrix>Treatment Notes). Review this report before leaving for the day and notify the appropriate clinical staff to complete any missing treatment notes before rollover.
For instructions on reviewing treatment notes in the Matrix, see the Treatment Notes article linked at the bottom of this page.
Prepare Tomorrow's Schedule
Each evening you should check the appointment types for the next day to ensure that everything is ready. While you will need to pull the same reports the next morning to prepare for the day, it's better to be prepared the night before! The following are helpful:
- Create an appointment list for appointments requiring Lab Work. Matrix>Appointments>Scheduled. Update a column reflecting Procedure/Status, Lab Work, Notes or Grid Notes.
- Create an Appointment List for Scheduled appointments with Past Due Balances or pull the report Report>Appointments with Balances > 30 days.
- Create a Report for Treatment Coordinators - Report>Appointments of Type
Review the related articles Appointment Analysis and Track Lab Work referenced at the bottom of this page.
Backup for Onsite Servers
Important: This section applies only to practices using an onsite server. Lightning Cloud practices do not perform manual backups.
Backing up is the most important function your office performs with your Tops Ortho system. A clean and recent backup will save your practice data if there’s a hardware failure. We can use an external backup to restore Tops Ortho in about an hour. The backup method outlined in the referenced article below is not a "preferred" method; it’s the required method and it’s the only way we can restore your practice data if there is a hardware failure.
Review the related article Backup Basics for Onsite Servers at the bottom of this page.
Other Quick Reminders
Complete End-of-DayTasks
Before leaving for the day, review any outstanding clinical, financial, and administrative tasks to ensure nothing is missed.
Clinical
- Review patients who require a follow-up phone call after their appointment. Contact the patient or assign the follow-up to the appropriate team member.
- Confirm that any required lab work has been prepared and submitted to the appropriate lab.
Financial
- Verify that all charges for services and contracts have been entered in Tops. Review the Financial Day Sheet to confirm the day’s financial activity is complete and accurate.
- Cross-check payments received throughout the day to ensure they have all been entered in Tops.
Communication
- Review any Tops communication services and respond to outstanding patient text messages.
- Navigate to Matrix > Letters/Forms and confirm that all required letters and forms have been generated and sent.
Scheduling
- Review patients currently listed in the Reschedule Drawer. Determine whether the appointment should remain available for rescheduling or whether it should be canceled and a recall created for future follow-up.
- Review Matrix > D7 Patient Care Tracking > New Patients Entered to verify that each new patient has a next step. Confirm that:
- A future appointment or follow-up has been scheduled, if appropriate.
- Any required forms, letters, or other patient communications have been generated and sent.
Tip: Every patient interaction should end with a documented next step. Whether it’s a scheduled appointment, a recall, completed paperwork, or a follow-up communication, completing these tasks before leaving for the day helps ensure patients continue moving through treatment without unnecessary delays.