Add Insurance After a Contract Has Been Activated or Deactivated
If a patient obtains insurance coverage after treatment has already started, you can add the insurance information and manually create claims for eligible treatment.
The process differs slightly depending on whether the patient's contract is still active or has already been deactivated.
Example: A patient starts treatment as self-pay and obtains orthodontic insurance six months later. Add the insurance information to the patient chart, then manually generate an Initial or Date Range claim so the insurance carrier can begin reimbursing eligible treatment charges.
Before You Begin
Verify the following:
- The patient's insurance information has been received and verified.
- The policy holder and employer policy information are accurate.
- The insurance policy was effective during the treatment period being billed.
- The insurance carrier accepts claims for treatment already in progress.
Active Contract Workflow
Step 1: Add the Insurance Information
- Open the patient's chart.
- Navigate to View > Patient Info or press Command-I.
- Add the patient's insurance information.
- Verify the following:
- Insurance Company
- Employer Policy
- Policy Holder
- Subscriber ID and Group Number (if applicable)
- If outdated policy holder information exists, use Clear Policy Holder before entering the new information.
- Save your changes.
Step 2: Review the Active Contract
- Select the Contracts/Ledgers tab.
- Double-click the active contract to open the Contract Worksheet.
- Review the contract details and confirm:
- The contract is active.
- Total treatment fees are correct.
- Initial fees are correct.
- Future charges cover the expected treatment period.
No changes to the contract are typically required simply because insurance has been added. However, if you feel the initial fee and monthly contract charges will not align with what the insurance company requires on a claim, it may be best to manually file the claim directly in the payer's portal.
Step 3: Manually Generate an Insurance Claim
- With the patient chart open, select Action > New Insurance Claim.
- Choose the appropriate claim type:
- Initial Claim - Use Initial when submitting a work-in-progress claim for treatment that has already started.
- Date Range Claim - Use Date Range when you need to generate a claim for specific posted charges.
- Select Date Range.
- Enter the appropriate dates of service.
- Verify the charges included in the claim.
Step 4: Complete the Claim
- Select the appropriate claim form.
- Add any Internal Notes in the Notes field. This is not the Remarks section of the claim.
- Add any necessary Remarks in the Additional Comments field. Any Remarks added will be included in Box 35 on the claim form. Include Work in Progress notes when appropriate to explain the patient's current treatment status.
- Select the Appropriate Policy Holder/Employer Policy for the claim form.
- Review the claim information for accuracy.
Step 5: Create and Submit the Claim
- Click Add New Claims to Tops.
- Review the generated claim.
- Submit the claim:
- Electronically through E-Claims,
- Through the payer portal, or
- By mail if required by the insurance carrier.
Inactive Contract Workflow
If the patient's contract has already been deactivated, additional review may be required before filing a claim.
Step 1: Add the Insurance Information
- Open the patient's chart.
- Navigate to View > Patient Info or press Command-I.
- Add the patient's insurance information.
- Verify the following:
- Insurance Company
- Employer Policy
- Policy Holder
- Subscriber ID and Group Number (if applicable)
- If outdated policy holder information exists, use Clear Policy Holder before entering the new information.
- Save your changes.
Step 2: Review the Contract and Insurance Effective Dates
Before creating a claim, review the treatment plan and the deactivated contract, and determine whether the treatment period falls within the new insurance policy's effective dates.
Verify:
- The patient was eligible for benefits during treatment.
- The contract treatment dates/monthly charges overlap with the insurance coverage period.
- The insurance carrier accepts claims for treatment already in progress or completed.
Step 3: Create a Manual Claim
- Select Action > New Insurance Claim.
- Choose one of the following:
- Initial Claim for a work-in-progress submission.
- Date Range Claim for specific dates of service or posted charges.
- Select the appropriate claim form.
- Add detailed Internal Notes in the Notes field and Work in Progress remarks in the Additional Comments field, describing the patient's treatment status and treatment dates.
Step 4: Create and Submit the Claim
- Click Add New Claims to Tops.
- Review the generated claim.
- Submit the claim:
- Electronically through E-Claims,
- Through the payer portal, or
- By mail if required by the insurance carrier.
In some situations, the generated claim may not meet the carrier's requirements for treatment that has already been completed. When this occurs, filing through the payer portal or mailing a paper claim may be necessary.
Step 5: Prevent Future Automatic Claims
After the initial claim has been created and submitted:
- Open the patient's insurance information.
- Uncheck Make Claims Automatically.
- Remove the Next Claim Date.
This prevents Tops from attempting to generate future claims for a contract that is no longer active.
Important Notes
- Adding insurance after treatment has started does not automatically adjust the patient's contract terms.
- Expected Insurance may need to be updated after claim payments are received and benefits are verified. See below for more information on how to update.
- If contract modifications are necessary, carefully review the contract total and payment schedule to ensure financial balances remain accurate.
- Insurance carriers vary in their willingness to accept claims submitted after treatment has already begun or after treatment has been completed.
- Always verify carrier requirements, filing procedures, and timely filing limits before submitting claims for an active or deactivated contract.
Update Expected Insurance After Adding Insurance
Only use this process when a patient’s contract was created without Accept Assignment or when the contract has already been deactivated. Please refer to the articles referenced at the bottom of this page - What to Do When a Patient's Benefit Increases.
If insurance was not included in the original contract and an insurance benefit is now expected, increase the patient’s Expected Insurance balance by the anticipated benefit amount. This action does not change the contract total. Instead, it reallocates a portion of the remaining balance from the patient’s responsibility to the insurance company’s responsibility, creating a credit that must be cycled through the contract.
Increase the Expected Insurance Amount
- Open the patient's chart.
- Navigate to the Contracts/Ledgers tab.
- Select Action > Change Expected Insurance.
- Increase the Expected Insurance amount by the estimated insurance benefit.
- Click OK.
What Happens to the Ledger?
When Expected Insurance is increased:
- The patient's responsibility is reduced.
- A credit is created in the patient's Due Now balance.
- The contract total does not change.
- The insurance is effectively being treated as paying a portion of the patient's remaining balance.
The credit must be cycled through the contract so the patient's future payment schedule accurately reflects the new insurance responsibility.
Cycle the Credit Through the Contract
Important: Increasing Expected Insurance does not automatically recalculate or rebalance an active contract. After increasing Expected Insurance, the contract should be reviewed and reworked so that the resulting Due Now credit is properly cycled through the contract and the patient's future payment schedule remains accurate.
The goal is not to change the contract value, but rather to redistribute the remaining patient responsibility. Think of the insurance benefit as paying ahead a portion of the patient's future balance. The contract must then be adjusted so the patient's future charges and payments accurately reflect that anticipated insurance contribution.
After increasing Expected Insurance:
- Open the patient's active Contract Worksheet.
- Review the credit now showing in the patient's Due Now balance.
- Rework the contract schedule so that a charge equal to the credit amount posts on the following day.
- Adjust the remaining future charges and dates based on the patient's revised payment arrangement.
- Record the updated contract.
Important
When reworking the contract:
- The contract amount should remain unchanged.
- The total of all contract charges should continue to equal the original contract value.
- Only the timing and allocation of future charges should be adjusted.
- The objective is to move the credit created by the Expected Insurance increase back into the contract structure so the patient's ledger remains accurate.
Example
A patient has an active contract with a remaining balance of $2,250. The practice verifies that insurance is expected to pay $1,500.

-
Increase Expected Insurance by $1,500.
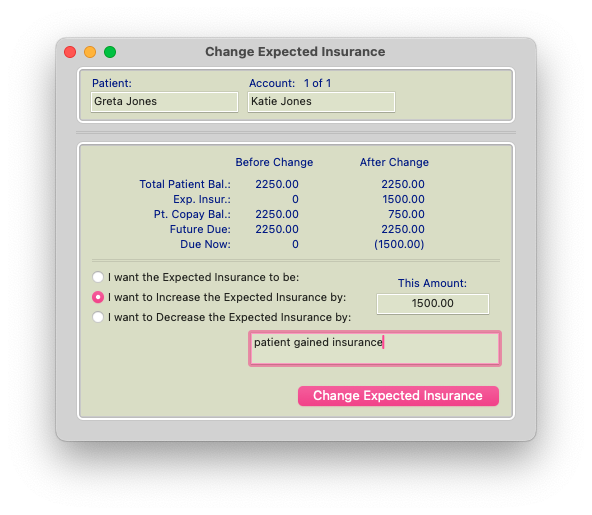
-
A $1,500 credit appears in the patient's Due Now balance.

-
Open the Contract Worksheet.
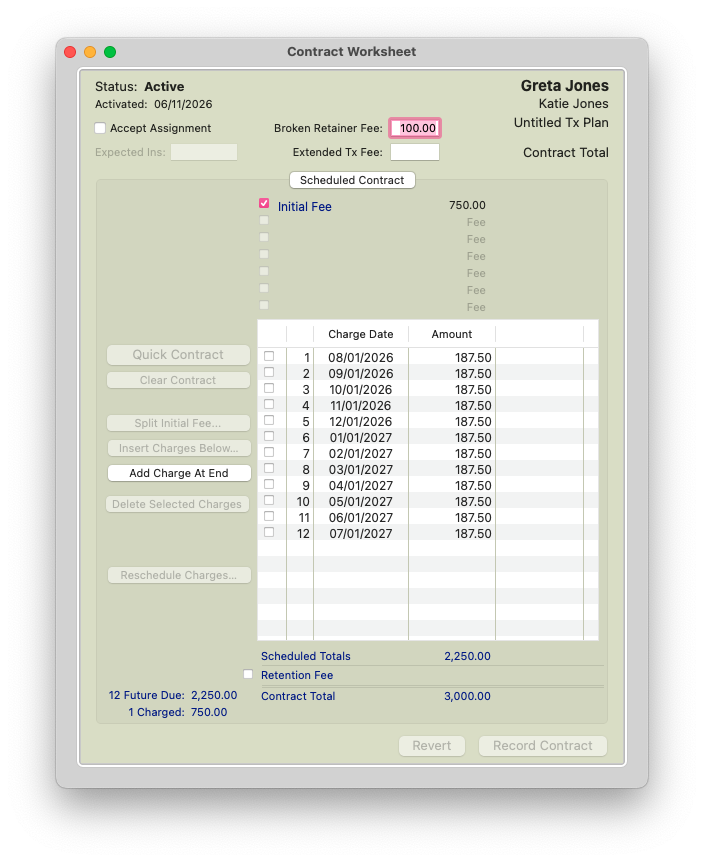
-
Rework the contract so a $1500 charge posts immediately (typically the next day).
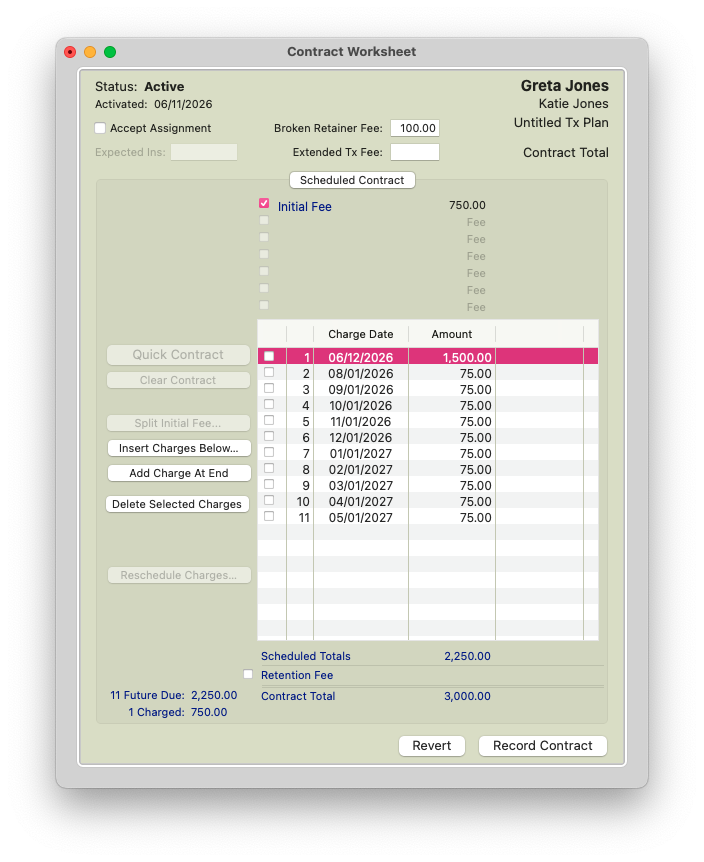
- Adjust the remaining future charges and payment schedule accordingly. Click Record Contract.


The contract total remains unchanged, but a portion of the patient's future responsibility has now been shifted to insurance. The $1500.00 Charge will post on the next day and cycle out the $1500.00 credit sitting in the Due Now.
