
Create a New Treatment Phase
Understanding Treatment Phases
Think of a Treatment Phase as a specific period in a patient’s care. Each phase represents a point in their treatment journey, allowing you to document and reference their clinical history throughout their lifetime in your practice.
A Treatment Phase may represent:
- An initial examination that results in Monitoring Development
- Phase I (Interceptive) Treatment
- Comprehensive Treatment
- Comprehensive Second Phase Treatment
- Limited Treatment
Each phase maintains its own clinical history, including the Exam/Diagnosis, treatment recommendations, visits, images, phase notes, treatment start and end dates, clinical notes, and associated treatment information.
When should you create a new Treatment Phase?
Create a new phase when a patient returns for a new period of care that requires a new examination, diagnosis, and treatment recommendations.
For example, a patient who completed Phase I treatment at age 9 may return at age 12 for Comprehensive Second Phase Treatment. Rather than replacing their original clinical findings, create a new Treatment Phase to document their current diagnosis and recommended treatment.
This preserves their previous phase and allows you to reference their earlier clinical history at any time.
💡 Tops Tip: Treatment Phases are not intended to represent different treatment options. If you’re presenting multiple ways to treat a patient during the same phase, create additional Treatment Plans instead. See Create a New Treatment Plan for more information.
⚠️ Important! Treatment Phases Cannot Be Deleted
Once a Treatment Phase has been created, it cannot be deleted.
If you accidentally create a phase:
- Rename the automatically created Treatment Plan to DO NOT USE.
- Add a note in the Treatment Plan’s Comments field indicating that the phase was created in error and should not be used.
-
Remove the Treatment Phase so that it reflect None.
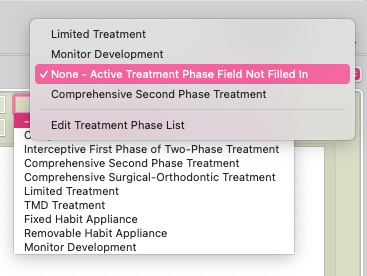
- Return to the Treatment Phase list and make sure the correct phase is marked Active.
Always confirm that the correct Treatment Phase is marked Active before documenting clinical findings or creating Treatment Plans. This ensures your documentation and treatment recommendations are associated with the appropriate phase of care.
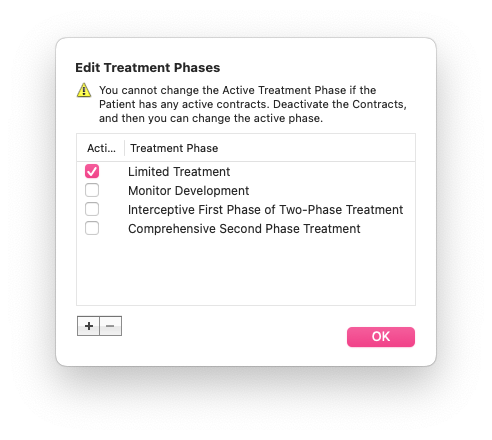
Important: The checkmark displayed in the Treatment Phase dropdown indicates which phase you are currently viewing, not necessarily which phase is Active. To verify or change the active phase, select Edit Treatment Phase List and confirm that the correct phase is marked Active.
|
|
|
Before You Create a New Treatment Phase
Before creating a new Treatment Phase, take a moment to review the patient’s current phase and make sure their clinical history accurately reflects how that period of care ended.
Ask yourself:
- Treatment Status: Does the patient’s status accurately reflect where they were when the phase ended? Did they transition to Monitor with Retention or Final Retention? Or did they move directly into another phase of Active Treatment?
- Treatment Dates: If applicable, are the Treatment Start and End Dates accurate? Confirm that these dates reflect when treatment actually began and ended during that phase.
- Phase Transitions: Did the patient move directly from Phase I to Phase II without a break in treatment? Document this transition in the Treatment Phase Notes, available in the Clinical Drawer.
Remember: Not every phase ends with a change in Treatment Status. For example, a patient transitioning directly from Phase I to Phase II may remain in Active Treatment. However, you may need to update the Treatment End Date to reflect when Phase I concluded.
💡 Tops Tip: Your patient’s clinical history should tell the story of their actual treatment journey. Keep Treatment Statuses, dates, and phase notes accurate to reflect what really happened during each phase. This ensures you can confidently reference their treatment history throughout their lifetime in your care.
Create a New Treatment Phase
Let’s walk through an example!
Nancy completed her first phase of treatment when she was 9 years old. Now she’s 12 and ready for Phase II treatment.
Her chart still contains the Exam/Diagnosis and treatment information from her previous phase. Rather than replacing those findings, we’ll create a new Treatment Phase to document her current clinical needs while preserving her Phase I history.

Let's add her second phase!
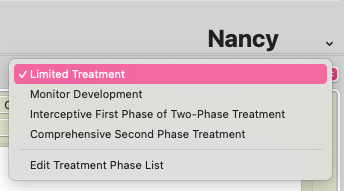
- Click on the up/down arrows on the top right and select Edit Treatment Phase List.
- In the window that opens, click the + icon.
-
Click Create Phase.

- Your new phase will be labeled None; click OK.
- You will see that Nancy's diagnostic findings no longer show; don't worry! They are still saved under her Interceptive Phase. Toggle to this phase on the upper right to view them at any time.
- Add Nancy's Phase II information. Make sure to select the phase label so it will no longer be called None.
-
When Nancy is ready to begin Phase II treatment, click on the dropdown on the upper right and select Edit Treatment Phase List.

-
Place the checkmark on your new phase to tell Tops Ortho that this is now Nancy's active phase of treatment. Click OK.

-
That's it! You will now see that Nancy has all image sets available, so you can add Initial, Progress, and Final images. You can also add a new contract.


